As we all know, using Docker container is very popular these days. However, Docker isn‘t always the best way, and there is a lack of information on how to locally setup Dynamics 365 Business Central 2020 Wave 1 release (or BC 2019 fall release) on your computer or server without using Docker. We will use the latest Business Central version as an example in this article, but the same approach will also work for previously released Business Central versions. Please keep reading if you are interested in step-by-step instructions on how to go from downloading the Business Central installation package to playing around with Web Client.
- All released cumulative updates for Dynamics 365 Business Central 2020 Wave 1 can be downloaded from this link.
- Let’s download and extract the DVD folder and install Business Central from it. There should appear the folder “AL Development Environment” in “…Program Files (x86)Microsoft Dynamics 365 Business Central160” directory after installation.
- Then we will need two more folders to be moved into this directory: “…Program Files (x86)Microsoft Dynamics 365 Business Central160”. The first one is for local service, another one for web service. These folders can be found in the DVD folder:
-
- 1 “…DVDServiceTierprogram filesMicrosoft Dynamics NAV160Service” – for local service.
-
- 2 “…DVDWebClientMicrosoft Dynamics NAV160Web Client” – for web service.
- When all folders are ready – let’s restore the Demo database on the SQL server. The demo database backup file can be found in the DVD folder: “…DVDSQLDemoDatabaseCommonAppDataMicrosoftMicrosoft Dynamics NAV160DatabaseDemo Database NAV (16-0).bak”. In this guide, we will restore the .bak file on the SQL2016 server. Please note that this backup file does not support SQL2012 and older versions. So basically, it can be restored on SQL2014 or any higher version.
- After the demo backup is restored – we will connect the database to local service. In order to do that we need local service. Let’s create and connect it to our demo database:
-
- 1 Take a copy of the Service folder in the same directory, which was moved in step 3. Name it as you like (we will use the basic name “NAV_1600CU1_W1”).

- 1 Take a copy of the Service folder in the same directory, which was moved in step 3. Name it as you like (we will use the basic name “NAV_1600CU1_W1”).
-
- 2 Please note that local services can be created in various ways, so if you are used to any other approach than explained below – feel free to use it. Using this particular approach, we need to start by adding some security users to the demo database. Let’s create two security network users (NT AUTHORITYNETWORK SERVICE, NT AUTHORITYSYSTEM, and your full User ID if needed). For all users, it is needed to set some Memberships to true: db_accessadmin, db_owner, db_securityadmin. In addition to this, set user “NT AUTHORITYNETWORK SERVICE” Owned Schemas to true for the same parameters as it was set in the Memberships tab.
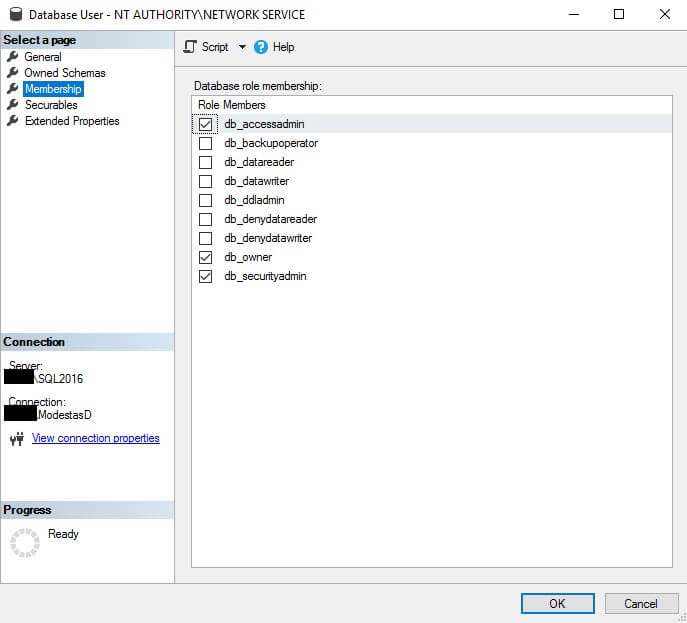
- 2 Please note that local services can be created in various ways, so if you are used to any other approach than explained below – feel free to use it. Using this particular approach, we need to start by adding some security users to the demo database. Let’s create two security network users (NT AUTHORITYNETWORK SERVICE, NT AUTHORITYSYSTEM, and your full User ID if needed). For all users, it is needed to set some Memberships to true: db_accessadmin, db_owner, db_securityadmin. In addition to this, set user “NT AUTHORITYNETWORK SERVICE” Owned Schemas to true for the same parameters as it was set in the Memberships tab.
-
- 3 When these users are created, let’s run the command line (cmd.exe) as an administrator and use these commands to create local service and reserve the URL. Keep in mind, that you need to replace “NAV_1600CU1_W1” entries with the created service folder name and specify the full path instead of …:
- sc create MicrosoftDynamicsNAVServer$NAV_1600CU1_W1 binpath= “…Program Files (x86)Microsoft Dynamics 365 Business Central160 NAV_1600CU1_W1Microsoft.Dynamics.Nav.Server.exe $NAV_1600CU1_W1” DisplayName= “Microsoft Dynamics NAV Server NAV_1600CU1_W1” start= auto type= own depend= NetTcpPortSharing
- netsh http add urlacl url=http://+:7046/NAV_1600CU1_W1/ user= “NT AUTHORITYNETWORK SERVICE” listen=yes delegate=no sddl=”D:(A;;GX;;;NS)”
- 3 When these users are created, let’s run the command line (cmd.exe) as an administrator and use these commands to create local service and reserve the URL. Keep in mind, that you need to replace “NAV_1600CU1_W1” entries with the created service folder name and specify the full path instead of …:
-
- 4 When the service is created – let’s open the newly copied service folder and find the config file. In CustomSettings.config file it is needed to set 3 properties: <DatabaseServer> -database server containing demo database (e.g. “SQLSQL2016”), <DatabaseName> – restored demo database name (e.g. “Demo Database NAV (16-0)”) and <ServerInstance> – previously created service name (e.g. “NAV_1600CU1_W1”).
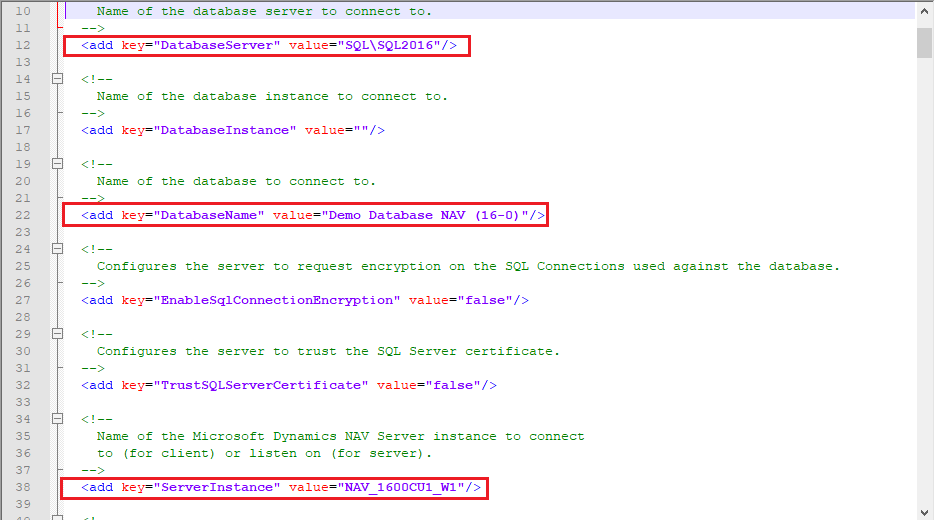
- 4 When the service is created – let’s open the newly copied service folder and find the config file. In CustomSettings.config file it is needed to set 3 properties: <DatabaseServer> -database server containing demo database (e.g. “SQLSQL2016”), <DatabaseName> – restored demo database name (e.g. “Demo Database NAV (16-0)”) and <ServerInstance> – previously created service name (e.g. “NAV_1600CU1_W1”).
-
- 5 Let’s start the service. It should run without any errors if everything specified correctly.
- When the local service is ready and running without any errors, it is time to setup web service. Please note that it is a must-have local service created and running as they will be connected. Web Service can be created by using Windows PowerShell commands.
- Let’s run Windows PowerShell as administrator and import web service modules by using this command (Do not forget to change ‘..’ to the local path):
- Import-Module ‘..Program Files (x86)Microsoft Dynamics 365 Business Central160Web ClientModulesNAVWebClientManagementNAVWebClientManagement.psm1‘
- When modules are imported from the folder we moved in step 3, let’s run this command in PowerShell to create the actual web service (Do not forget to change “NAV_1600CU1_W1” entries to your service instance name):
- New-NAVWebServerInstance -PublishFolder ‘C:Program Files (x86)Microsoft Dynamics 365 Business Central160Web ClientWebPublish’ -WebServerInstance NAV_1600CU1_W1 -Server localhost -ServerInstance NAV_1600CU1_W1 -ClientServicesCredentialType Windows -WebSitePort 8080
- Before running the demo database – let‘s import Business Central 1500 or 1600 version license to the database by using this Powershell command (Do not forget to change ‘…’ to the local path):
-
- 1 First of all, let’s import the required module:Import-Module ‘…Program Files (x86)Microsoft Dynamics 365 Business Central160ServiceMicrosoft.Dynamics.Nav.Management.dll’
-
- 2 And now let’s import the license file: Import-NAVServerLicense NAV_1600CU1_W1 -LicenseData ([Byte[]]$(Get-Content -Path “…LicensesNAV1600License.flf” -Encoding Byte)) -Database 2
- The last step is to run our Web Client. Let‘s search for the „IIS“(Internet Information Services) in Windows, then go to USERID->Sites, expand web service packages and find created web service, in this case, it should be „NAV_1600CU1_W1”. Start the service package if it is stopped, and click on the web service instance, and click on “Browse *.8080 (Http)”. In the popped-up login form, enter your Windows credentials.

- Congratulations! Your Web Client is now all set up. Enjoy testing all the new features and functionalities – you just setup Dynamics 365 Business Central 2020 Wave 1 release locally!
We hope that you found this article on How to Locally Setup Dynamics 365 Business Central 2020 Wave 1 release useful. Do not forget to explore other blog posts for more interesting topics on Dynamics 365 Business Central.