Guidelines for Partners
The concept of data migration is similar for both multitenant and single-tenant environments. However, the multitenant NAV data migration process involves additional configuration steps due to the separation of tenant data and NAV objects in different databases. This article guides setting up, upgrading, and executing data migration for Multitenant Dynamics NAV to Dynamics BC Cloud migration. For further details, refer to the primary sources available on Microsoft Learn:
Upgrading the Database to in a Multitenant Deployment – Business Central | Microsoft Learn
Migrating to Single-Tenancy From Multitenancy – Business Central | Microsoft Learn
How to setup multitenant Dynamics NAV database
In a single-tenant Dynamics NAV database, both data and objects coexist. However, in a multitenancy scenario, there is a distinct separation: one Database for objects (the APP database) and separate tenant databases for data (the DATA databases).
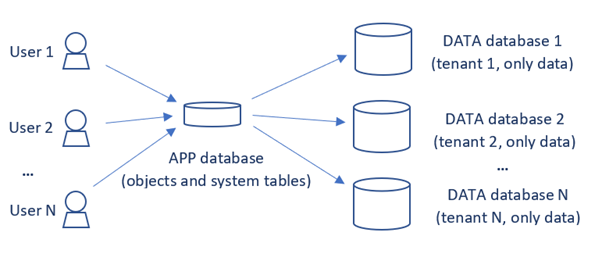
In the picture above, you can see how multitenancy works. Users cannot directly use DATA databases (tenants). Data databases do not contain NAV system tables, so the Microsoft Dynamics NAV development environment cannot see these databases. The application database (APP database) includes tables that store information about the application and system, which all tenants require. Therefore, the Microsoft Dynamics NAV development environment can see the APP database as an NAV database. All objects and system tables are located in the APP database, so you should use it to select and mount tenants and synchronize them with the DATA database.
Step 1: Create an application database
There are two ways to create an APP database:
- Create a new database using the New-NAVApplicationDatabase cmdlet.
- Create a new database using the Microsoft Development Environment.
Import all objects. Publish and install any required applications or extensions.
Step 2: Configure the NAV Server Instance for multitenancy
There are two ways to configure a server instance:
- Use the Dynamics NAV server administration tool. Navigate to the NAV server instance to which you want to connect the Database, and choose the Edit button. Set the DatabaseInstance, DatabaseName, and DatabaseServer settings and enable the Multitenant setting. The DatabaseName should be the name of the APP database.
- Go to the service folder, find and modify the CustomSettings.config file. Set the DatabaseInstance, DatabaseName, and DatabaseServer settings, and enable the Multitenantsetting. The DatabaseName should be the name of the APP database.
Step 3: Mount tenants
Run server instance connected to the APP database; you can follow two configuration methods:
- To mount a tenant using PowerShell, you can use the following command:
Mount-NAVTenant -ServerInstance <instanceName> -DatabaseName
<DATAdatabaseName> -DatabaseServer <serverName> -Tenant <tenantID>-
AllowAppDatabaseWrite -OverwriteTenantIdInDatabase
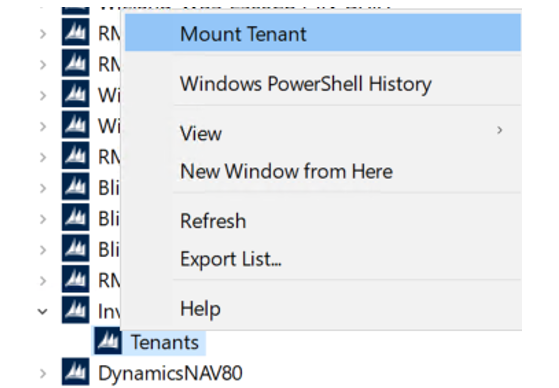
To mount a tenant using Microsoft Dynamics NAV Server, follow these steps:
- Run Microsoft Dynamics NAV Server as Administrator.
- Navigate to the Tenant: in the left pane, expand “Console Root” -> “Microsoft Dynamics NAV (Local).”
- Locate your created server instance and expand it.
Mount the Tenant: right-click on the “Tenant” node and choose “Mount Tenant.”
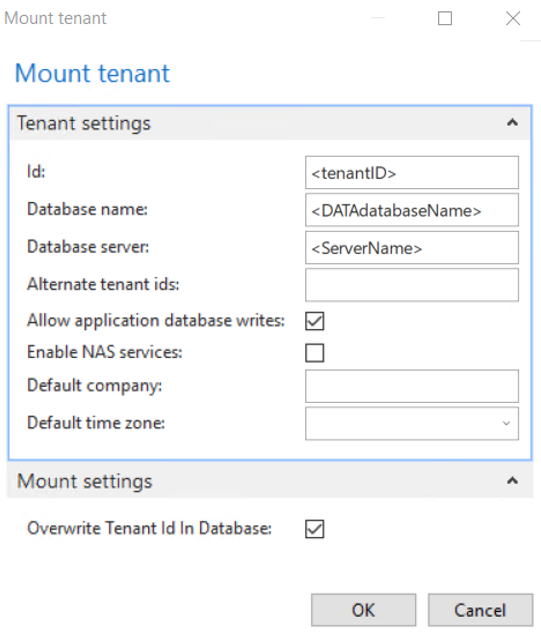
To configure the settings for your Tenant, follow these steps:
- Specify the name of your DATA database in the Database name field
- Specify Database server name
- Enable “Allow application database writes”
- Enable “Overwrite Tenant ID in Database” if you want to overwrite the Tenant ID in the Database.
When configuring tenant IDs, you have two options:
- You can manually specify the tenant ID or overwrite it. This allows you to set a specific ID for the Tenant.
- Use the last used tenant ID. If you choose this option, you should check the last used tenant ID with Microsoft SQL Server Management Studio. Open SQL Server Management Studio and connect to your database server. Navigate to the [$ndo$tenantproperty] table and look at the tenantID field.
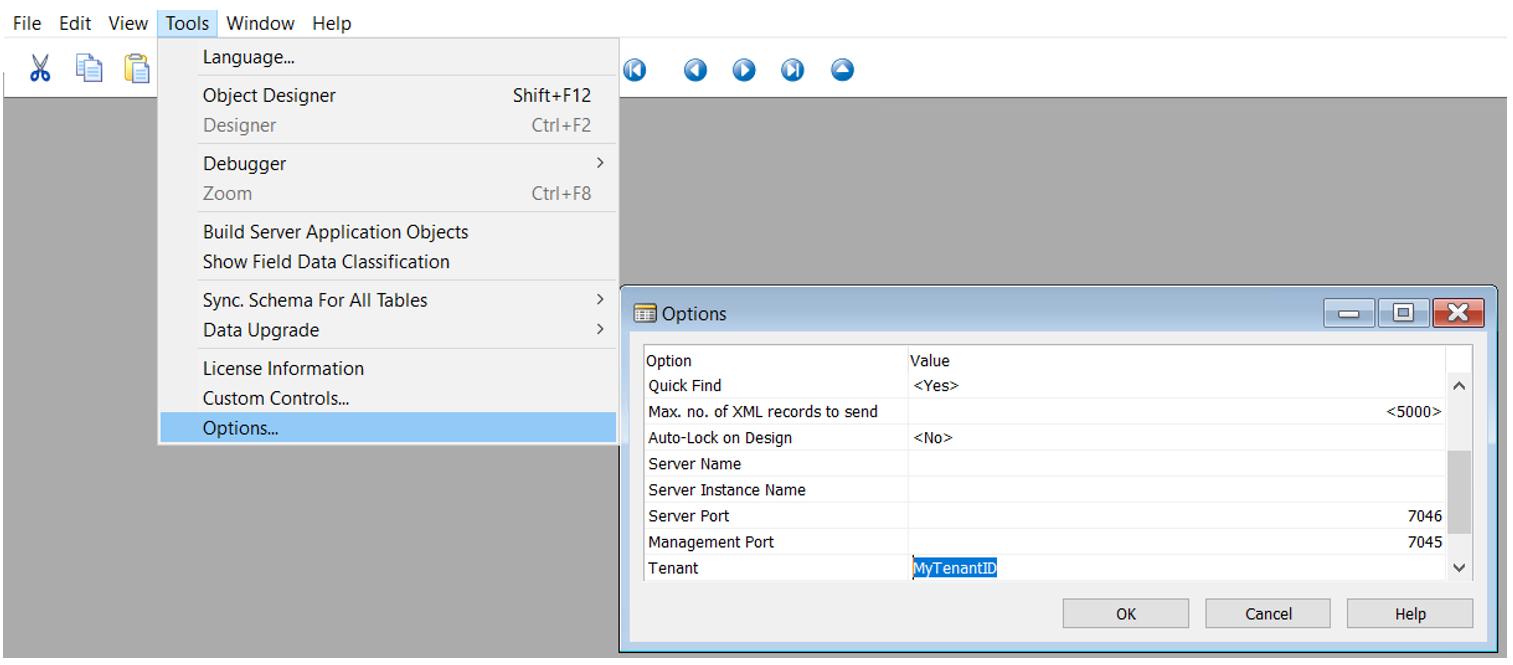
To set the Tenant ID in the Dynamics NAV development environment, open the APP database as an Administrator. Go to the “Tools” menu and choose “Options.” Find the field for TenantID and enter the desired TenantID.
Now you can work with one Tenant. You can set up and work with each Tenant.
Multitenant Dynamics NAV database to Business Central 14 data migration
At this start point, we have configured databases on Microsoft Dynamics NAV 2015. Data migration from Microsoft Dynamics NAV 2015 to Business Central 14 includes standard data migration and data upgrade steps.
Step 1: Convert to Business Central 14
Open APP database with the Microsoft Dynamics NAV development environment and remove all objects except tables.
Close Microsoft Dynamics NAV development environment.
Before starting the conversion, you should dismount the Tenant. You can use either a PowerShell command or the Microsoft Dynamics NAV Server:
1..Using Microsoft Dynamics NAV Server, run it as an administrator, find your service instance, select your Tenant, and right-click on the Tenant. Choose “Dismount tenant.”
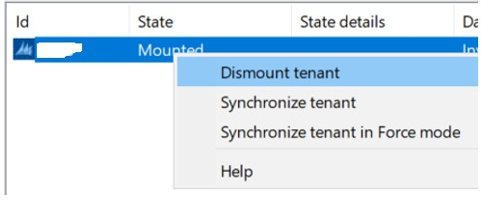
2. To dismount the Tenant using PowerShell, execute the following command:
Dismount-NAVTenant -ServerInstance <appInstanceName> -tenant <tenantID>
Now, you are ready for conversion. Open the APP database using the Business Central 14 development environment. It is essential to run it as an administrator. Follow the instructions on the screen to convert the Database.
If the process is completed without any errors, you should compile all system objects (objects with ID 2000000000..2000000999).
Step 2: Mount the Tenant and run schema synchronization
Create and run a server instance for BC14, in the configuration settings, enable Multitenancy.
You can mount the Tenant using either Microsoft Dynamics 365 Business Central Server or PowerShell. For example, using PowerShell, execute the following command:
Mount-NAVTenant -ServerInstance MyServerInstance -DatabaseName MyDATAdatabaseName -
DatabaseServer MyServerName -Tenant MyTenantID -AllowAppDatabaseWrite -
OverwriteTenantIdInDatabase
Now, you can run schema synchronization. Use PowerShell and execute the following command:
Sync-NavTenant –ServerInstance MyInstanceName -Tenant MyTenantID -Mode Sync
Step 3: Import BC14 objects and upgrade the toolkit
In the Business Central development environment, import all prepared intermediate objects for BC14 to the APP database. Import upgrade toolkit. For example, we can use Upgrade80014x.DK.fob file, located in BC14 dvd folder, because start point was NAV 2015.
When you import the FOB file, if you experience metadata conflicts, use the “replace all” in Import Worksheet to handle these conflicts. In the dialog box for selecting the schema synchronization, set the Synchronize Schema option to Later.
Step 4: Run schema synchronization
This step is significant because it involves running upgrade toolkit functions. You have two options for performing schema synchronization: either from the Business Central development environment or using PowerShell:
Sync-NavTenant –ServerInstance MyInstanceName -Tenant MyTenantID -Mode Sync
Step 5: Run Data Upgrade
Before beginning the data upgrade, it is essential to update the license. The license can be updated using the PowerShell command:
Import-NAVServerLicense <ServiceName> -Tenant <tenantID> -LicenseData ([Byte[]]$(Get-
Content -Path "C:\Licenses\LicenseName.flf" -Encoding Byte))
Restart the server instance.
There are two ways to run a data upgrade:
- Using the Business Central 14 development environment, choose Tools -> Data Upgrade -> Start. Use “Serial” execution mode.
- Using PowerShell command:
Start-NAVDataUpgrade -ServerInstance <InstanceName> -Tenant <tenantID> -FunctionExecutionMode Serial
You can check progress using the command:
Get-NAVDataUpgrade -ServerInstance <InstanceName> -Tenant <tenantID> -Progress
You can check the final data upgrade status using the command:
Get-NAVDataUpgrade -ServerInstance <InstanceName> -Tenant <tenantID> -ErrorOnly
After a successful data upgrade, it is essential to remove obsolete objects. Delete objects that have Version List “UPGTK*” using the “Force” synchronization option. Delete obsolete tables within the filter:
452|453|464|465|470|824|825|826|827|828|829|830|1305|5150|8640
When deleting, use Synchronize Schema „Force“.
If you have more than one tenant database, you should repeat 2-5 steps for each Tenant.
Multitenant Business Central 14 database to Business Central 24 data migration
Now that we are starting from Business Central 14, let’s proceed with upgrading the Database to Business Central 24 OnPrem version.
Step 1: Convert to Business Central 24
Delete all objects except tables and system code units.
Stop BC14 server instance.
Close BC14 development environment.
Use PowerShell commands to import BC24 modules and to convert the Database from BC14 to BC24:
Import-Module “..\Microsoft Dynamics 365 Business
Central\240\Service\Management\Microsoft.Dynamics.Nav.Management.dll”

Invoke-NAVApplicationDatabaseConversion -DatabaseServer <serverName> -DatabaseName <APPdatabaseName>
Step 2: Mount the Tenant
If you have more than one tenant database, you should repeat the next steps for each Database.
Create and run a service instance, and make sure Multitenancy is enabled.
Use the PowerShell command to mount the Tenant:
Mount-NAVTenant -ServerInstance <APP database instanceName> -DatabaseName <DATA
databaseName> -DatabaseServer <server\instance> -Tenant <tenantID> -
AllowAppDatabaseWrite -OverwriteTenantIdInDatabase
Step 3: Publish system and base applications
Modify destination apps for migration settings for service instance using PowerShell commands:
Set-NAVServerConfiguration -ServerInstance <instance name> -KeyName
"DestinationAppsForMigration" -KeyValue '[{"appId":"63ca2fa4-4f03-4f2b-a480-
172fef340d3f", "name":"System Application", "publisher":
"Microsoft"},{"appId":"f3552374-a1f2-4356-848e-196002525837", "name":"Business
Foundation", "publisher": "Microsoft"},{"appId":"437dbf0e-84ff-417a-965d-
ed2bb9650972", "name":"Base Application", "publisher": "Microsoft"}]'
Restart server instance.
Update the license if it is not updated:
Import-NAVServerLicense <instanceName> -Tenant <tenantID> -LicenseData
([Byte[]]$(Get-Content -Path "C:\path\license.bclicense" -Encoding Byte))
You will need to find the next app files in the BC24 dvd folder:
- System.app
- Microsoft_System Application.app
- Microsoft_Business Foundation.app
- Microsoft_Base Application.app
Publish these apps using PowerShell commands:
Publish-NAVApp -ServerInstance <instanceName> -Path "path\System.app" -tenant <tenantID> -
PackageType SymbolsOnly
Publish-NAVApp -ServerInstance <instanceName> -tenant <tenantID> -Path
"path\Microsoft_System Application.app" -SkipVerification

Publish-NAVApp -ServerInstance <instanceName> -tenant <tenantID> -Path
"path\Microsoft_Business Foundation.app" -SkipVerification

Publish-NAVApp -ServerInstance <instanceName> -tenant <tenantID> -Path "path\Microsoft_Base
Application.app" -SkipVerification
Step 4: Run Schema Synchronization
Use PowerShell commands:
Sync-NAVTenant -ServerInstance <instanceName> -Tenant <tenantID> -Mode Sync

Sync-NAVApp -ServerInstance <instanceName> -Tenant <tenantID> -Name "System Application"

Sync-NAVApp -ServerInstance <instanceName> -Tenant <tenantID> -Name "Business Foundation"

Sync-NAVApp -ServerInstance <instanceName> -Tenant <tenantID> -Name "Base Application"
Step 5: Run Data Upgrade
Run data upgrade process using PowerShell command:
Start-NAVDataUpgrade -ServerInstance <instanceName> -Tenant <tenantID> -
FunctionExecutionMode Serial -SkipAppVersionCheck
If you want to see progress, you can use the command:
Get-NAVDataUpgrade -ServerInstance <instanceName> -Tenant <tenantID> -Progress
Finally, check the data upgrade for errors using the next command:
Get-NAVDataUpgrade -ServerInstance <instanceName> -Tenant <tenantID> -ErrorOnly
Step 6: Install all essential apps
If the data upgrade is completed successfully, the BaseApp will be installed. You can now proceed to install any important applications and/or extensions.
Example PowerShell commands:
Publish-NAVApp -ServerInstance <instanceName> -Tenant <TenantID> -Path
"path\Microsoft_Application.app" -SkipVerification

Sync-NAVApp -ServerInstance <instanceName> -Tenant <TenantID> -Name "Application"

Install-NAVApp -ServerInstance <instanceName> -Tenant <TenantID> -Name "Application"
Multitenant Business Central 24 database SaaS data migration
The data migration process from a multitenant database in BC24 to SaaS is similar to the single-tenant process. However, if you intend to consolidate different Tenants into a single SaaS instance, you will need to repeat the migration process for each Tenant.
Step 1: Set up Microsoft Integration runtime service
If the Microsoft Integration runtime service is not installed, download and install it. For more information, see Install SQL Server Integration Services – SQL Server Integration Services (SSIS) | Microsoft Learn.
Step 2: Set up Cloud Migration
In your SaaS environment, go to the Extension Management page and make sure all your applications are published and installed.
Go to the Assisted Setup page and choose “Set up Cloud Migration”.
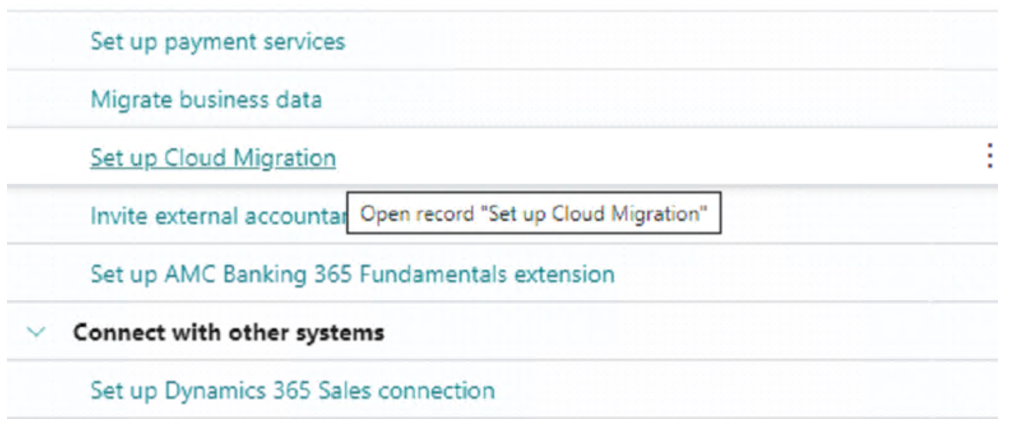
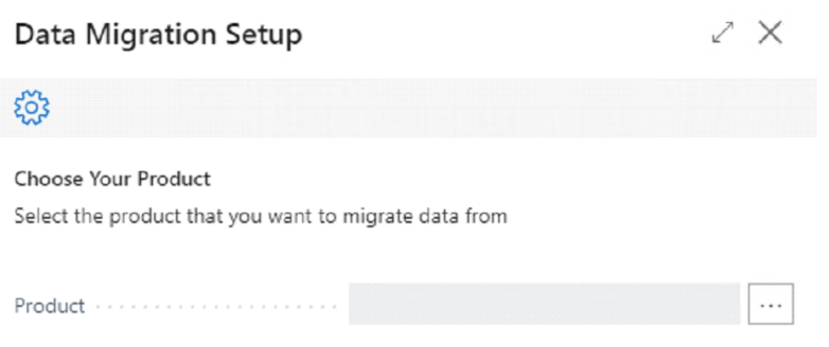
Read information about warnings & privacy, and on the next page, choose from which product you are migrating.
Connect your IIS service to SaaS. You can fill SQL connection String by template:
Server=myServerName;Database=MyDataBase;User Id=MyUsername;Password=MyPassword
If you are setting up Cloud Migration for the first time, leave the “Integration Runtime Name” field empty. You will need to create a new integration runtime.
Copy and paste the provided authentication key into the integration runtime service window.
Once the SaaS environment is connected, follow the instructions on the page and choose companies to migrate.
Step 3: Run data migration
On “Cloud Migration Management,” you will see the prepared Cloud data migration. The process can be started manually; just press the “Run Migration Now” action.
It is important to review “Tables Failes” and “Tables not Migrated”.
If cloud migration is completed successfully, repeat steps 2-3 for each tenant database.
Check not Initialized Companies. If you can see any not initialized companies, press the “Schedule company initialization” action this will start the process of company initialization.
Multitenant Business Central 14 database to Single-tenant
Sometimes, we need to modify our data migration plan, moving from multitenant databases to a single-tenant database. In this example, I will demonstrate how you can consolidate data from all tenant databases into a single-tenant database. If you need more information, please visit Microsoft Learn Migrating to Single-Tenancy From Multitenancy – Business Central | Microsoft Learn
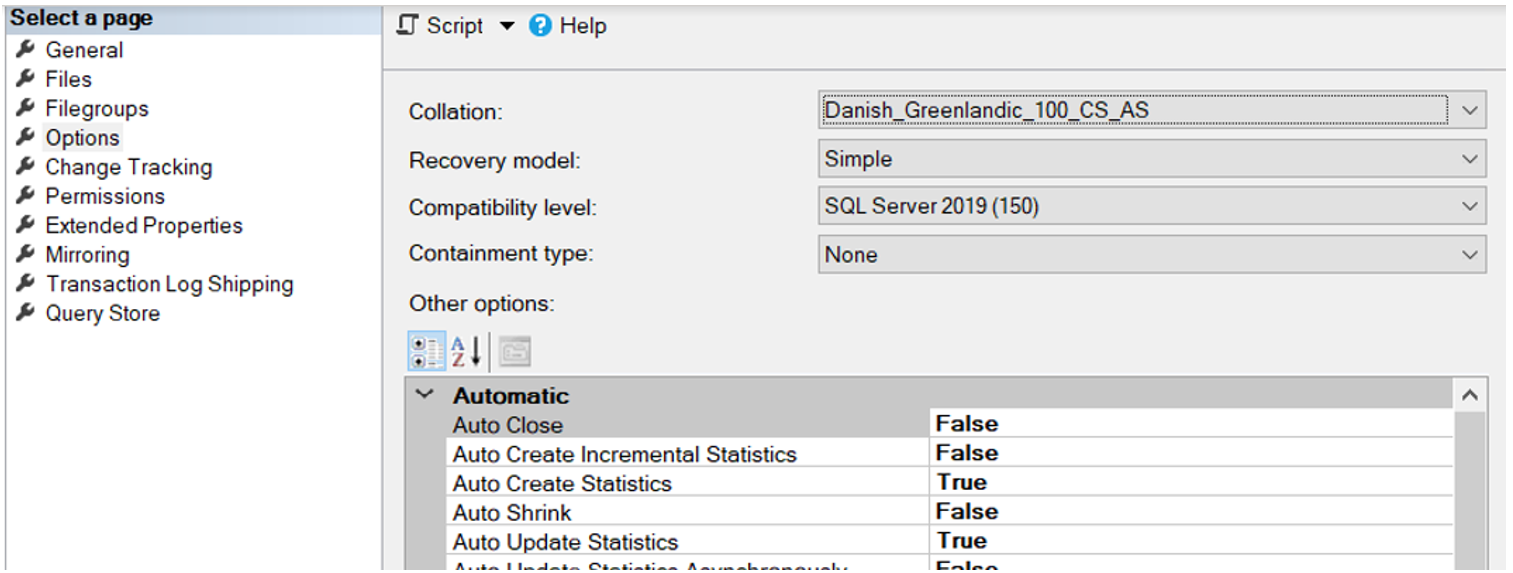
Step 1: Change APP database collocation
To change the collation of the APP database, use Microsoft SQL Server Management Studio. Open the Database properties -> Navigate to Options -> Locate the Collation setting. Ensure that the collation matches that of the DATA database.
Step 2: Change APP database collocation
If your APP database objects are modified, you should export all objects as FOB files.
Dismount your tenant databases, use PowerShell commands:
Dismount-NAVTenant -ServerInstance <appInstanceName> -tenant <tenantID>
Stop server instance and remove application tables from tenant databases (if they exist):
Remove-NAVApplication -DatabaseName <dataDatabaseName> -DatabaseServer <serverName>
Now, the main idea is to export data from the tenant database to a separate file and then import this data into the newly created single-tenant Database:
Export-NAVData -DatabaseServer "<myservername>" -DatabaseName "<data database
name>" -IncludeGlobalData -AllCompanies -FilePath "<C:\yourfilepath\MyDB1.navdata>"
Create a new empty Database with the same BC version. Import all objects from your APP database.
Create a server instance and run it. Multitenancy must be disabled.
Import data from .navdata files:
Import-NAVData -DatabaseServer "<server name>" -DatabaseName "<Database Name>" -
IncludeGlobalData -AllCompanies -FilePath "<your path to .navdata file>"
Step 3: Run Schema Synchronization
You can run the schema synchronization from the Business Central development environment or using PowerShell.
- From the development environment on the Tools menu, choose “Sync. Schema For All Tables”, then select “With Validation” and follow the schema synchronization instructions.
- Using PowerShell command:
Sync-NavTenant –ServerInstance <ServerInstanceName> -Mode Sync
Make sure the synchronization state is Operational.
Conclusion
In summary, migrating data in Multitenant Dynamics NAV to Dynamics BC Cloud migration involves additional steps due to the separation of application objects and tenant data into different databases. This guide has detailed the setup, upgrade, and execution of data migration for multitenant Dynamics NAV databases, covering key stages from configuration to final data upgrades.
Simplanova specializes in providing these migration services to ensure a smooth and efficient process. For more information, fill out the online form below.
Clean-Start Upgrade Calculator
Fill in the form below with your customer Dynamics NAV/365 BC solution data and you will receive the fixed price Proposal by email instantly. If you have any questions, just drop us an email by [email protected]. Not sure where to find information to fill-in the fields below? Download our tool which will help you extract that information from customer solution.