Guidelines for Partners
One of the significant limitations we face when upgrading to Business Central’s SaaS environment is our local or server’s file system usage. Various NAV or BC solutions often use the file system to save files for archiving purposes or to be processed later by an automated job.
There are multiple methods of refactoring various file system usages ranging from file downloads and uploads to connecting to an online drive. In this guideline, we will develop an app that can connect to an online drive using Microsoft’s Graph API through Azure services.
OAuth2.0
OAuth2.0 (Open Authorization 2.0) is a standard designed to allow a website or an application to access resources hosted by other web apps on behalf of a user. In this case, Business Central sends a request to our Azure application.
To receive some data from our OneDrive or Sharepoint. The requests can also be folder creations, file uploads, downloads, etc.
Open Authorization first has to provide the user with a way to authorize themselves through a login or any other type of input so that the application we’re trying to connect to knows what privileges and restrictions need to be applied to the client. Once authorized, the client can send a request to the application to receive the access token.
An access token is a piece of data representing the authorization to access the resources we want. While there isn’t a specific format in which the access token is defined, it’s usually received as a JSON web token. Once the access token has been received, there is no need to authorize it again for a given amount of time, and multiple requests can be sent to the application with the same access token. If the access token expires, there’s still a way to refresh the authorization, and it’s by using a refresh token.
A refresh token is a similar credential, but it’s used to get new access tokens without having to authorize them again, especially when we want Business Central to access the Azure resources by itself, without any user input (Usually during automated procedures). Refresh tokens combined with offline access privileges will mean that BC may only require authorization once at the setup phase.
To access a resource, OAuth2.0 requires the following data:
- Application/Client ID – The ID of the actual application.
- Application/Client secret – The password of the application.
- Redirect URL – Can be defined within the application.
- Authorization URL – The application’s URL is used to authorize the client.
- Access token URL – The application’s URL is used to receive an access token.
- Scope – A set of instructions/privileges to be used by the client.
- State – A randomly generated GUID is used to verify if there were no incorrect redirections.
Note: These requirements are obtained when an application is created within the Azure environment.
The process of gaining an Access Token:
- A GUID is created as a state identifier.
- An authorization URL is created using the following data:
- Client ID
- Redirect URL
- State
- Scope (Graph API resources)
- Response Type (Authorization code)
- The URL is opened in a separate window, and user input is required.
- Once authorized, the URI parameters contain the authorization code and the state.
- The original and returned state are compared to see if there were no redirections.
- A content text is created containing the following data:
- Grant Type (Authorization Code)
- Authorization Code
- Redirect URL
- Client ID
- Client Secret
- An HTTP web request is sent, and a response is collected in Json format.
An example of an access token in JSON format usually looks like this:
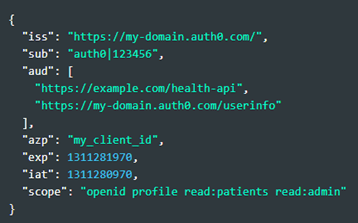
The access token contains the information about who issued it with what kind of privileges it grants, along with an expiration DateTime. The access token also includes a refresh token, which should be obtained and saved since it can be used to update the access token without any user input.
Microsoft Graph API
Microsoft Graph is the gateway to data and intelligence in Microsoft 365. It provides a unified programmability model that you can use to access the tremendous amount of data in Microsoft 365. The Microsoft Graph API offers a single endpoint to provide access to rich, people-centric data and insights in the Microsoft cloud:
- https://graph.microsoft.com/v1.0/me/drives
- https://graph.microsoft.com/v1.0/drives
- https://graph.microsoft.com/v1.0/me/drives/[DRIVE ID]/root/children
- https://graph.microsoft.com/v1.0/sites/[SITE ID]/drive
- https://graph.microsoft.com/v1.0/sites?search=*
- https://graph.microsoft.com/v1.0/sites/[SITE ID]/drives/[DRIVE ID]/root/children
Example:
Sending an HTTP request to https://graph.microsoft.com/v1.0/me/drives with an Access Token along with a method (‘Get’) will result in a response of a drive list that belongs to the user that has requested the Access Token during Authorization.
To save time from constant debugging and trying to find which graph URL is the correct one, Microsoft has a Graph Explorer tool prepared to experiment and see which graph links work within your Azure environment and what resources can be received:

Sending a GET request to the URL will provide information about the user’s drives.
Setting up an Azure application
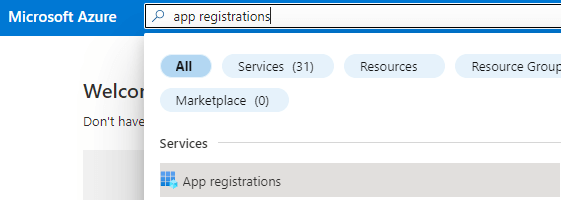
Before we send any requests to the Azure environment, we must create an application and set it up to obtain the previously mentioned requirements to send an OAuth2.0 request.
We begin by opening our Azure portal and searching for “App registrations”:
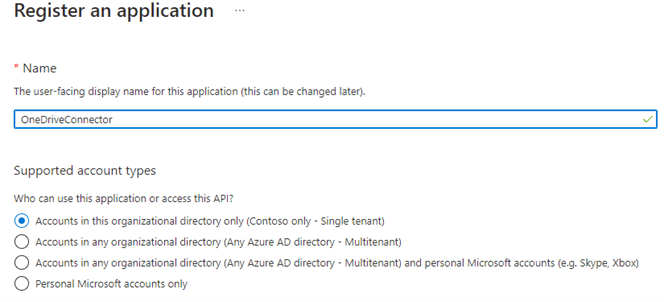
Once selected, a new app can be created with “New registration”. An app needs to be granted a name and a redirect URL, which, by default, should be the BC tenant’s URL with “OAuthLanding.htm” added at the end of the URL:

Once the Azure application has been created, the following requirements for an OAuth2.0 can be copied from the Overview page:
- Application (client) ID
- OAuth 2.0 authorization endpoint (v2) (From the Endpoints tab)
- OAuth 2.0 token endpoint (v2) (From the Endpoints tab)
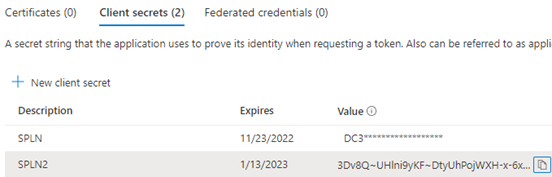
The Client secret can be created in the “Certificates & secrets” window:
Lastly, the permissions can be configured in the “API permissions” window by selecting “Add a permission” and choosing “Microsoft Graph” as an API. Both delegated, and application permissions can be added.
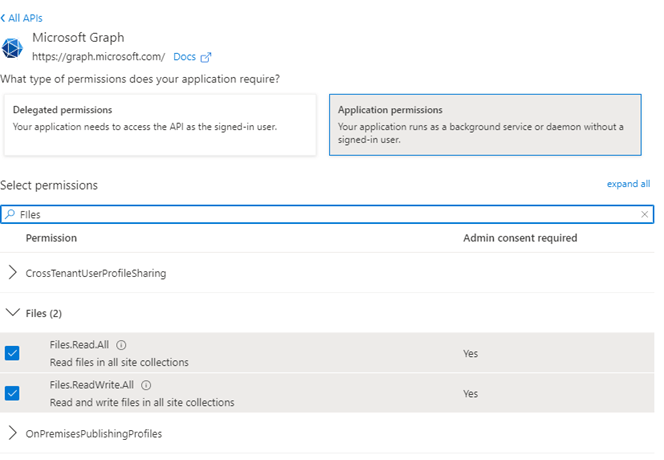
Some permissions may require admin consent to be granted; this can be achieved by selecting the “Grant admin consent” action.
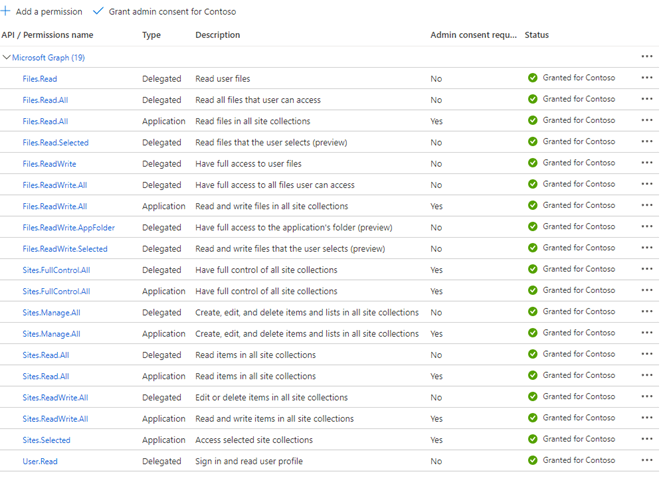
Once the permissions have been granted, the Azure application has been fully set up and can now be connected to an external source (In this case, Business Central).
Creating a basic connector in Business Central
To create a basic connector, which sends out HTTP requests to the Azure application, the previously mentioned OAuth2.0 requirements need to be stored in a setup table, which should contain the following fields:
- Primary Key
- Client ID
- Client Secret
- Redirect URL
- Scope (Graph API resources)
- Authorization URL (Authorization URL endpoint)
- Access Token URL (Access Token URL endpoint)
- Access Token (Stored as a BLOB)
- Refresh Token (Stored as a BLOB)
- Authorization Time (Time when authorized)
- Expires In (Expiration time)
- Expires In (Extended expiration time)
Once the table has been created, an appropriate page for the setup table needs to be made and filled in the relevant information:
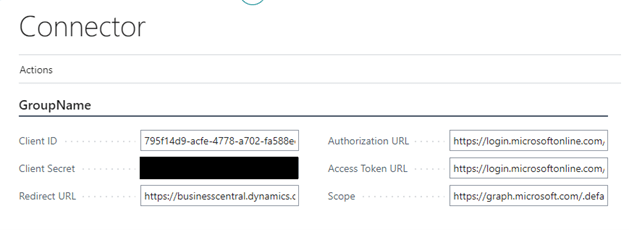
Note: The scope field contains the permissions we’d like to use when accessing the resource. To minimize the requirement for user input, it is suggested to use the offline access permissions, such as https://graph.microsoft.com/.default offline_access.
Now that the setup table has been filled in with the information needed to receive an access token, we can create a function that sends out a request to receive an authorization code and use it to receive an access token.
Since the authorization part requires the user to input their credentials, we will need to create a page along with a control add-in, which displays Azure’s login screen.
OAuthIntegration.js – A javascript-based code, which the control add-in will use to check if the Authorization Code has been retrieved.
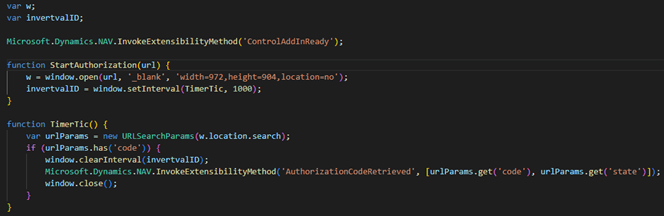
OAuth20Integration.ControlAddIn.al – A control add-in type object which uses the javascript file and creates a bridge between the AL code and javascript.
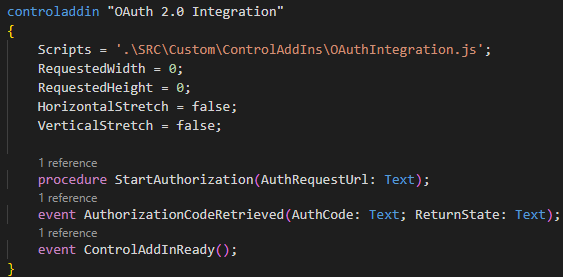
OAuth2Dialog.Page.al – The page launches the control add-in and retrieves the authorization code. The page also checks whether the provided and returned states match to see if there were no incorrect redirections to a wrong authorization page.
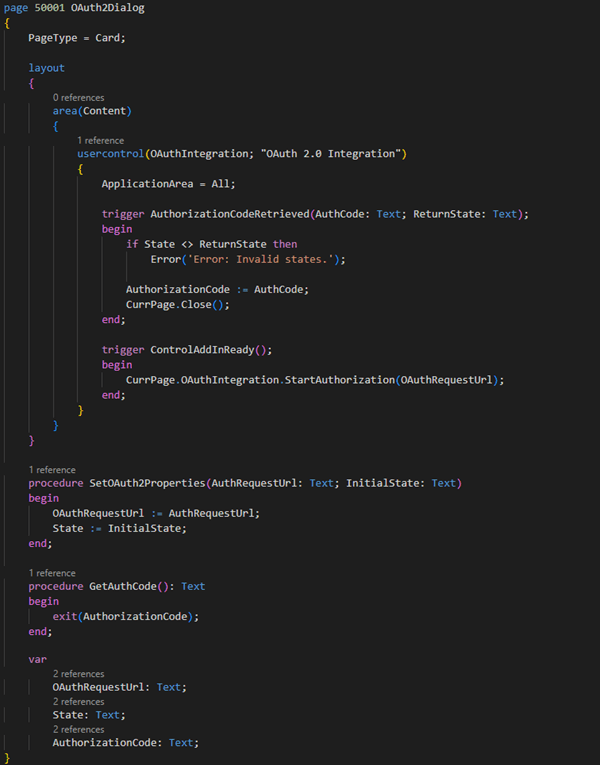
Now that the authorization page has been created, we may use it to make a function to receive an authorization code along with the access token:
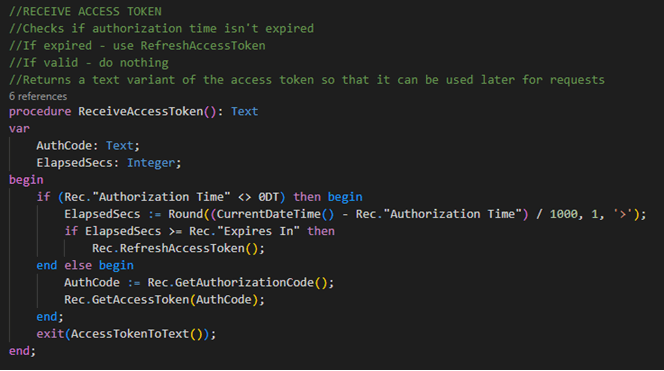
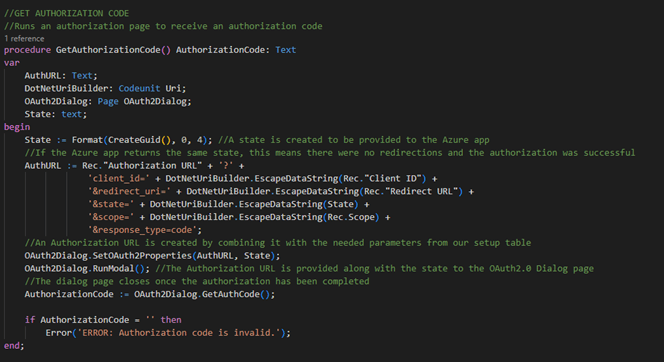
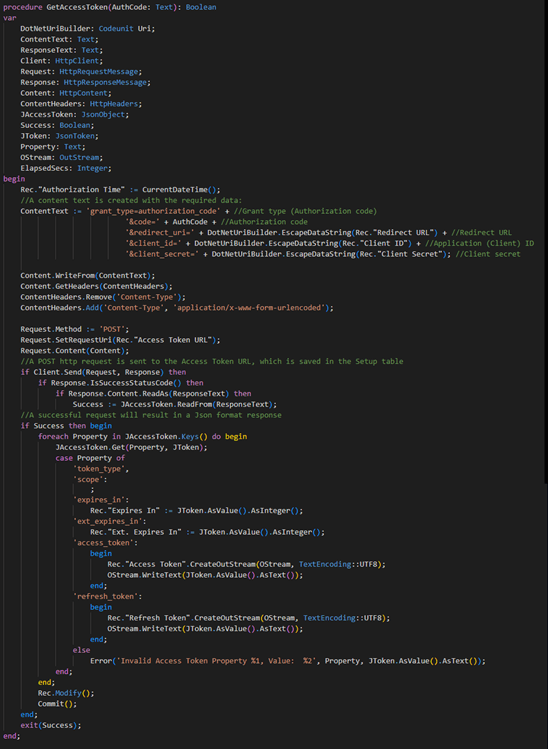
The code has been created within the connector setup table and is called by an action from the connector setup page. This code will ask for the user input to receive an authorization code, which will be used to obtain an access token and store it within the database along with the refresh token.
Sending requests to OneDrive
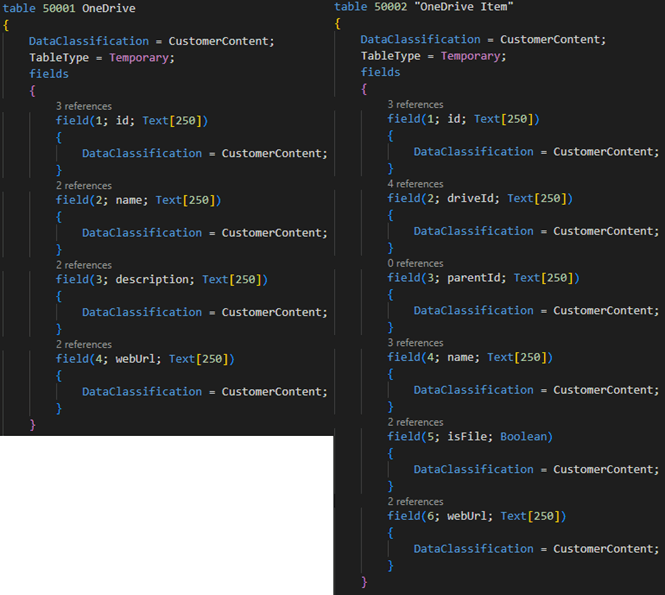
Accessing OneDrive would require the BC environment to receive a list of available drives and all of the items within the drives. The connector library will store all of the drive information within the two tables:
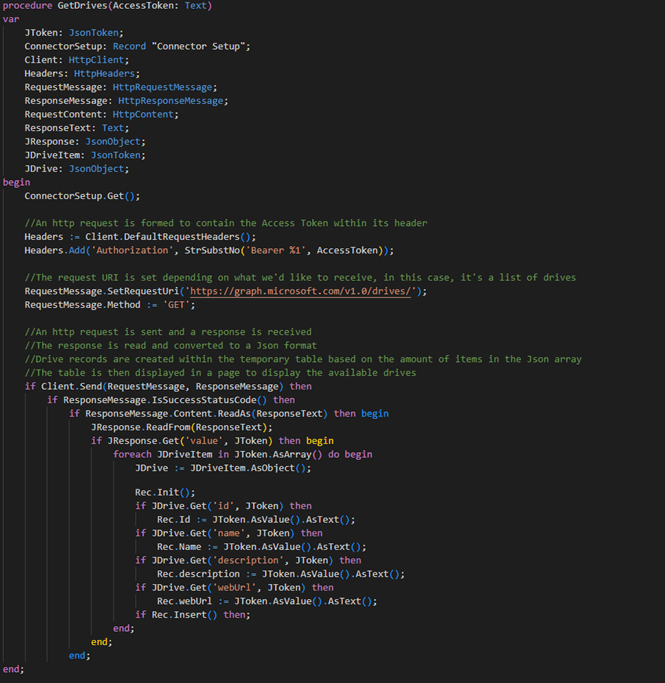
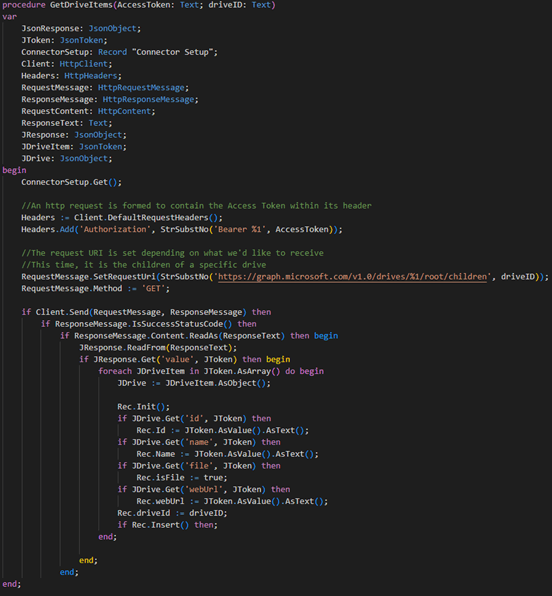
The drive table has been given a function that sends an HTTP request to receive a list of drives in OneDrive. The response, containing the list of drives, is then processed into the temporary table.
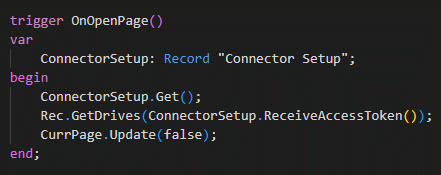
The temporary table can then be accessed with an appropriate page and the OnOpenPage trigger function.
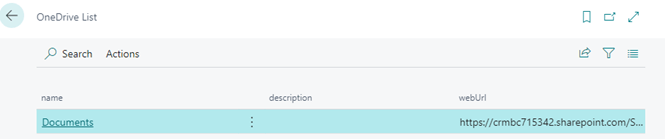
The result is a page that displays the number of drives within the authorized account’s OneDrive.
Additionally, an ID of the drive can be used to create another HTTP request to receive a list of items within the drive:
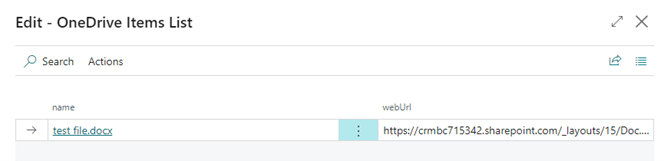
Finally, the result will display the selected drive’s items:
All in all, an entire file system can be replicated using this method. By constantly sending requests to receive OneDrive information, the connector app can store the file information in temporary tables. Meanwhile, the developer may want to expand the functionality further and allow the user to download, upload, delete, and edit the files within the OneDrive. The extended version of the connector app can be found in this GitHub link.