Guidelines for Partners
In previous blog posts, we wrote about managing AL code with Git and VS Code. Within them, we recommended a tool called GitExtensions, for performing most Git actions. Since then, the amount of Git features and their availability has increased within VS Code. As a result, it is possible to perform most of Git actions without the usage of extensions. However, if they are used, additional features become available. For example, creating and managing pull requests within VS Code. Thus, in this blog post, we will focus on using VS Code for version control purposes.
1. What you can do without extensions
VS Code uses your machine’s Git installation to perform version control actions. If it is not installed, some setup is required. You may refer to this blog post regarding Git setup (except for the GUI extension part). Once the setup is done, you can use Git functionality within VS Code.
Available functionality
Without having any extensions installed, VS Code is sufficient for managing a local repository (cloning, branching, commits, pushing to a remote branch, etc.). Here is a list of standard Git functions and how they are available:
- Clone – copies a repository from GitHub, Azure DevOps, or another services provider. It creates a local repository on your device.
- Commit – when you make a commit, the changes you made to multiple files are grouped into a single unit and added to the project history.
- Changes management:
- Discard changes to undo the file’s modifications.
- Stage changes to include in your next commit.
- Unstage to exclude them.
- Branch management:
- Create a new branch so that you can work on a task without impeding others’ work.
- Check out a different branch to view and work on a different version of a project.
- Synchronize – when using a remote repository, staying up to date becomes a requirement.
- Push changes to add new commits from your local branch to a remote one.
- Pull changes to update your local branch with commits from remote.
- Synchronizing changes is a combination of push and pull.
You may refer to VS Code official documentation regarding version control for a more extensive list of features.
Ways of using GIT in VS Code
There are multiple ways to perform a specific Git function within VS Code. First, you can use the UI: buttons, menus, and tabs. Another way is the Command Palette (shortcut – F1), where you can search for a Git action. Lastly, you may execute the commands directly through the VS Code terminal (Powershell).
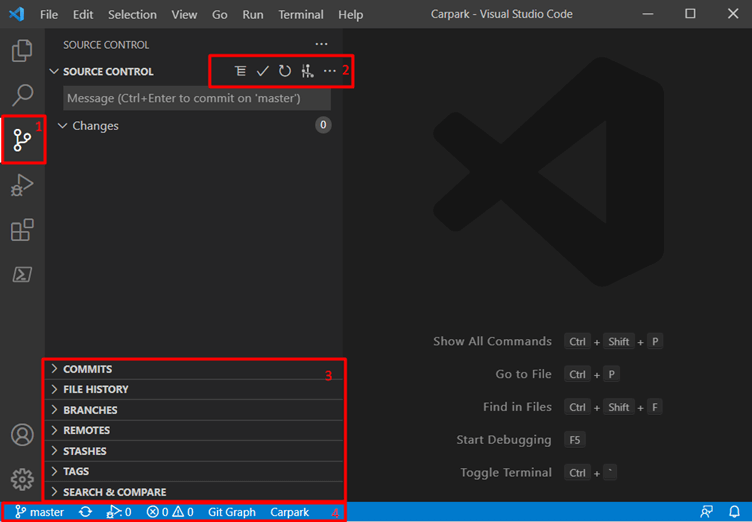
The UI: There are several sections to take note of when using Git functionality through the UI. VS Code has inbuilt Git support, which adds a Source Control tab (1) by default. Clicking it opens a Sidebar that contains Git-related actions and views. There are a few common actions (View as Tree, Commit, Refresh, More Actions) in the top section (2). You can access more specific information in other sections (3). Lastly (4), in the bottom bar, you will always see the status of your current repository: active branch, incoming/outgoing changes (or a circle if there are none).
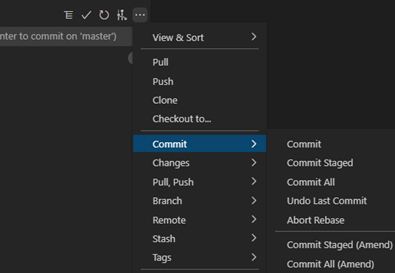
The menu: Clicking “More Actions” (triple dot in section 2) opens a menu with all available actions. They are grouped into categories based on the type of action: Commit, Changes, and others. In an illustration below, you may see that Command Palette (F1) search results resembled a group’s actions.
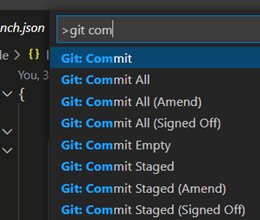
Command Palette: A viable alternative to memorizing the UI and eventually adapting to its changes is to use commands by searching for them or typing their names. Pressing F1 opens a bar where you can type. You can search for a specific command (git commit) and get a list of its variations. Alternatively, you can get a full list of commands by typing Git in the search bar. Note the “>” symbol when searching for a command; you would be searching for files without it.
Someone may ask: what about the terminal? When might one want to use it? For example, suppose that you look for a way to perform a particular task or fix an issue. And the solution (found after an extensive search) includes Git instructions for which there is no equivalent action or command in VS Code. The terminal is the only way to perform the solution within the development environment in such a case.
2. Integration with GitHub, Azure DevOps
We covered setting up a remote Azure DevOps repository in a previous post. When working with remote repositories, the usual workflow is to commit changes on a local branch and publish them on the remote repository. Having completed a task, one would visit an Azure DevOps or a GitHub webpage to create a pull request. Review, adding comments, resolving them, and completing the pull request are also done online. Managing pull requests, issues, and tasks cannot be done in VS Code with the default Git functionality. However, with the usage of extensions, it is possible to improve interaction with the remote repo webpages and/or add some of the actions to VS Code.
Extensions
There are multiple extensions for integrating with a specific remote repo provider. They vary in provided functionality, setup, and extra features. However, some things are common to most extensions. For example, they may add new tabs in VS Code and new items in the status bar. Also, the setup usually entails these steps:
- Download and install the extension in VS Code.
- Depending on the extension, you might need to restart VS Code.
- Open a new VS Code window (not a previous project).
- Open your cloned repository (GitHub/Azure).
- Authenticate with the version control services provider (frequent method – authentication via a browser, after successful authentication, a token is retrieved).
- (Optional) extension configuration: queries, remote branches.
We will provide two examples of such extensions. You may check their setup and functionality in the Visual Studio Marketplace.
Argutec Azure Repos
Argutec Azure Repos improves interaction with Azure DevOps by providing quick access to its pages. It adds five new elements to the status bar: repo name, pull requests, build status, work items, and feedback. Each of them is clickable, and the first four open a related Azure DevOps page. It also adds a collection of actions that are available in the Command Palette. They open Azure DevOps pages as well. For example, you may browse pull requests, open a specific pull request, create a new work item, link your commits to a work item and view a currently edited file in Azure DevOps.

Benefits
- Easier Azure DevOps navigation.
- Visibility of repository information.
Drawbacks
- Actions are performed in Azure DevOps.
- TFVC support is included, not useful for Git projects; it increases extension size.
GitHub Pull Requests and Issues
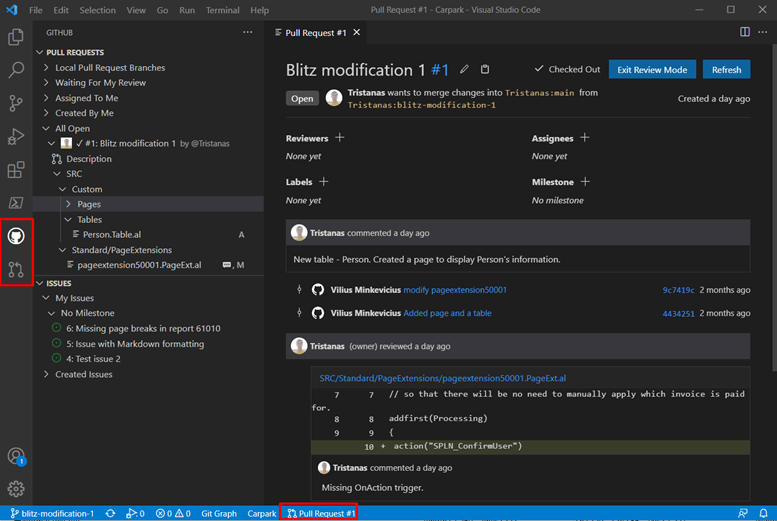
GitHub Pull Requests and Issues enables integration with GitHub and allows managing pull requests and issues within VS Code. The extension adds two new tabs: GitHub (pull requests, issues) and GitHub Pull Request (pull request reviews, completion). You can create, review, and complete pull requests, add comments and resolve conversations without leaving VS Code. In addition, when browsing pull requests and issues, you may right-click on an item for contextual actions (checkout branch, view online). This allows one to quickly transition into reviewing a pull request or resolving an issue.
We will cover two basic usage scenarios:
- Create a new pull request: pull Requests can be created by using the “Create Pull Request” action in Source Control and GitHub tabs or by using the “GitHub Pull Requests: Create Pull Request” command. You can specify source and destination branches, pull request title and description.
- Create an issue: issues can be created in the “Issues” section of the “GitHub” tab. Issue contents are set within a MarkDown file (cheatsheet for formatting). The first line is the issue title. You may assign users to the issue (third line) and add labels (fourth line). Starting from the sixth line, you may add a description.

Benefits
- A comprehensive collection of functions.
- Actions are performed within VS Code.
- Convenient contextual actions.
- Extension’s UI resembles GitHub pages.
Drawbacks
- This is a preview extension.
- Performance issues.
3. Helpful GIT-related extensions
GitLens
GitLens makes history and commits information easily accessible. For example, selecting a line within an open file will show when it was modified and who the author is. In addition, GitLens has a special mode, which displays much extra information. To enable it, press on “x authors” at the top of the first line of the file.
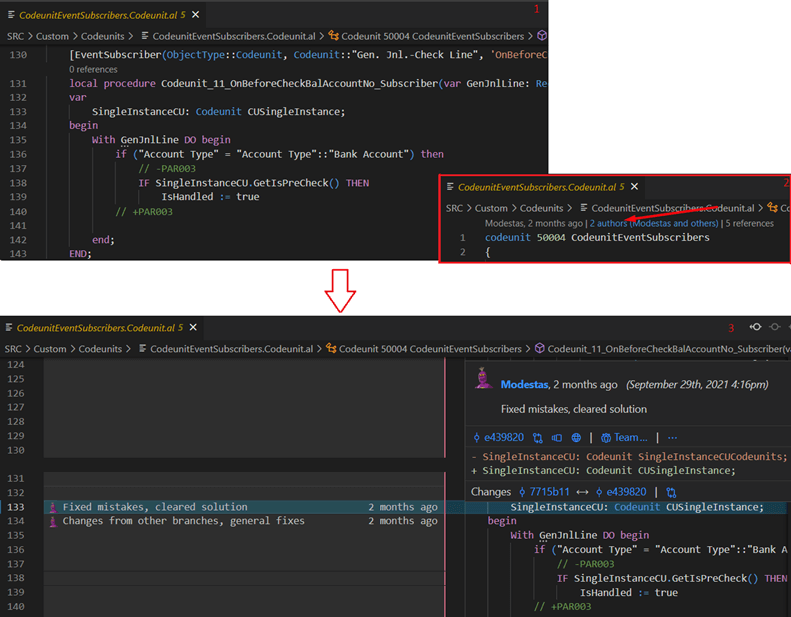
You can also view file history by navigating through its revisions (commits that modified it). Within each revision, two actions, “Previous Change” and “Next Change” help one navigate through modifications. This way, you may see how the code evolved.
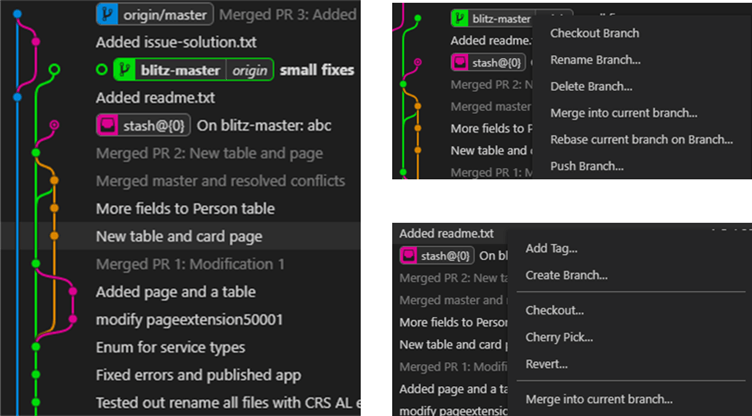
GitGraph
GitGraph provides a visual representation of the project’s contents. Within the graph, each line represents a commit. Branches’ heads are displayed at the start of the commit’s description. Contextual actions are available at each commit, branch, and tag.
Having seen what you can do with GIT in VS Code, the development environment may be the Swiss army knife for AL projects. There are more to each extension, and more uncovered extensions may be helpful to you. Thus I recommend searching for new extensions once in a while.