Guidelines for Partners
The ability to send reports directly to the printer is an important functionality for most clients. The standard approach currently implemented in Dynamics 365 Business Central is to download a report file (for example, pdf ) and only then send it to the printer. However, this way might not be the most efficient and convenient if you print large amounts of documents. In this article, we will cover a workaround that allows sending a report directly to the printer’s email address, which is a great option if you use an email printer.
OnAfterDocumentPrintReady Event
The OnAfterDocumentPrintReady event is a global integration event that is published in codeunit 44 “ReportManagement”. This event specifies what happens when the user selects the print action on a report request page. It is also triggered when Report.Print() or Report.Run() functions are called. Let’s analyze Report.Run case without a request page.
Let’s create a page action (in C/AL versions) that runs report 111 “Customer – Top 10 List” without a request page. The report is sent directly to a printer when the following code is executed:
If we upgrade this functionality to the AL version, the same code sends the report to the Downloads folder instead of a printer:

Of course, we can open the downloaded document and then print it, but that is not very convenient if we are printing many documents.
Instead, let‘s subscribe to OnAfterDocumentPrintReady event and automate direct sending to a printer using the printer‘s email address. First of all, we need to set up an email address to send emails from. Just open the „Email Accounts “ page and add a new account. Please note that there can be more than one account added. In this case – open the „Users“ page and fill in the field „Contact Email“ to specify an email address that will be used to send emails.
Our following step is to set up an account that will be used to send documents. Let‘s open the „Sales & Receivables Setup” page and fill in the “Printer Email Address” field by specifying a printer email address.
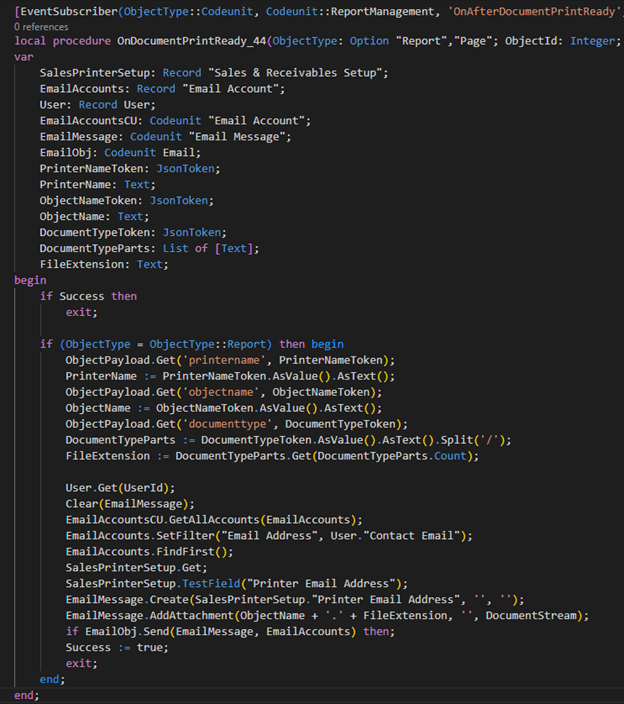
Lastly, let’s subscribe to OnAfterDocumentPrintReady event:
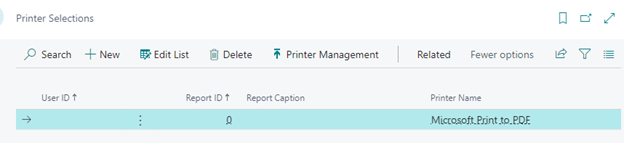
Printer Selections Page
The last step is to set up our default printer on the “Printer Selections” page. OnAfterDocumentPrintReady event will not be triggered if there is no record on this page. Please note that the “User ID” and “Report ID” fields are not mandatory to fill in (unless you want a functionality to work for a specific report or specific user). This printer selection is only used for event OnAfterDocumentPrintReady execution, so it is not necessary to specify an actual email printer you are using. Let’s just set up “Microsoft Print to PDF” as our default printer:
Conclusion
Once all of these steps are completed, our page action will execute Report.Run function triggers our OnAfterDocumentPrintReady event subscription and sends a document directly to the defined printer’s email address. Print away!