In this article, we want to discuss a topic, which is useful for all BC Partners and their projects. We will review how everyone could benefit from the Azure DevOps Pipeline service, even the companies that specialize in upgrades.
How we handle a project
First of all, continuous integration is not something the Dynamics 365 Business Central upgrade partner should be concerned about. The lifecycle for the upgrade project is quite short, and we don‘t work directly with the end-users – we choose other partners instead.
As our clients asking us to do more AL projects, we also had to move forward to the Azure DevOps environment in order to have control over source code for our projects.
Multiple developers work on the project to be able to deliver it to the customer on time. Also, during the support period, multiple developers might work on the project constantly making adjustments in order to give the customer the required feedback or resolve any issues as soon as possible. Because of that, we had to setup multiple Docker environments so that small adjustments would not interrupt colleagues working on the same project.
Maintaining multiple databases: using Azure Pipelines
But how can we have multiple databases in sync with the latest version of the extension?
This problem escalated even more during support periods when demand for more than one developer is not the case. It makes not used instances out of date and not ready for work when needed. That was the main reason why we had our first look into Azure DevOps Pipelines.
The general idea for us to use Azure DevOps Pipelines in upgrade objects is to keep everything ready for work. During the workday, a single developer can create multiple pull requests. These Pull Requests are reviewed by the Project Manager and merged-in to the master at least once a day, usually in the evening, after everyone submitted their changes.
Then we can use the scheduled Azure Pipeline to update all instances every night with the latest changes. This way, every instance will be ready for work, with the latest extensions installed. Even the instances that have not been touch in a while. It helps during the support period when more than one ticket is created for the project per day. Depending on demand, multiple developers could jump-in to work on them, fixing all the issues for our customers as fast as possible, without the necessity of updating the environments first. It saves time as all the sandbox environments will be ready for testing instantly without the need for developers to manually deploy the latest extensions.
For a bigger upgrade project, we are also looking forward to trying pipelines not only for deploying the app, but compiling and testing the code beforehand. If a new version failed to build or the app could not be published or installed, we will be notified.
It is even more helpful for partners, who are constantly developing new functionalities for customers. The pipelines will immediately notify if the newest build is not compiling or installing on a certain environment and could be investigated first thing in the morning.
Creating Yaml file for Azure Pipeline
Moreover, as I already mentioned it is not only the deployment tool but is also a service to initiate automated tests. It is the perfect tool that could help detect breaking changes before deploying them.
Pipeline actions are scripted via YAML file (.yml). This way, we can control what triggers the pipeline.
One of the cases would be when a certain branch is updated:

Unfortunately, this method is not an option for us, because this branch will be updated quite often in a short period of time, usually in the evenings, as the Project Manager will complete each pull request one by one. If we would use this kind of trigger, the pipeline would be initiated each time the pull request is completed.
As I mentioned at first, something like a simple schedule would meet our needs a bit better.
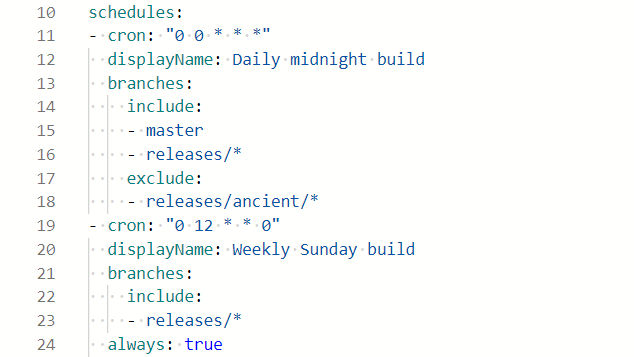
Using cron string from example, the pipeline will be initiated every midnight:
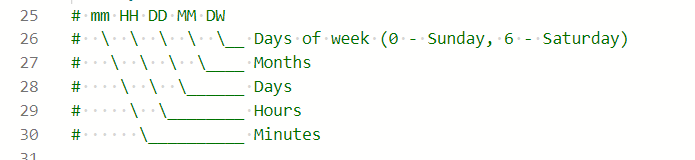
You can see the explanation for our string used in the example („0 0 * * *“). It can be used to adjust times according to your needs. By now, we already have a pipeline that is working. Further steps will be to create stages. For simplicity, during my testing, I have created only one stage – Build. It has only one job, which is to build a solution. I have used the Default pool for this job (I already had an agent prepared on our machine). Everything else is separated into tasks.
The first task is to create a new temporary BC container, in our local machine.
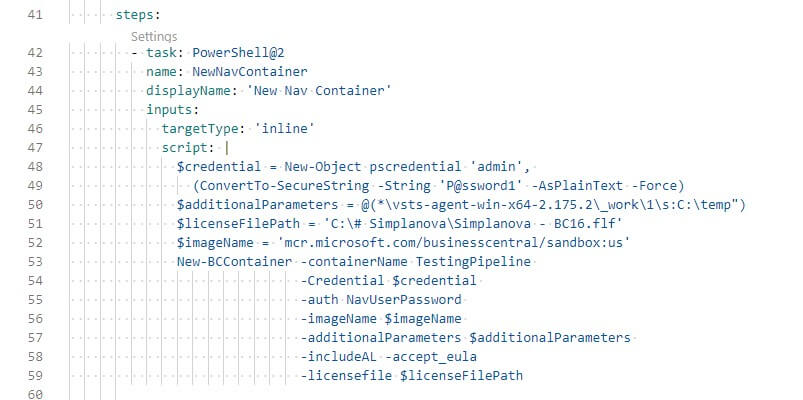
Take a note that $additionalParameters does not include information on ports we have used, as well as just a part of the full path to the agent, is shown.
After we have successfully created the container, we can try and compile the code and publish it. I have used a single task for these steps.
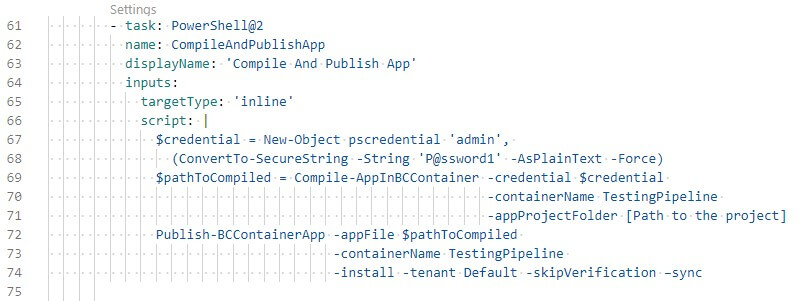
In our case, the source code of the project is in the volume we used while creating the container. And this needs to be directed there to compile it. After successful compilation, we receive a path to a new app for extension instantly used for publishing. Because we can run any PowerShell command, we can also invoke certain codeunit.
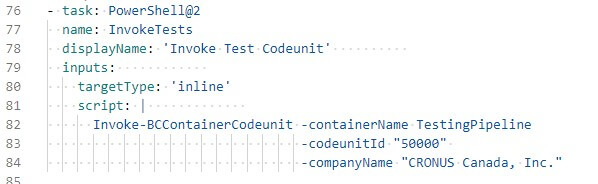
With this command, we could initiate a test codeunit. We are already working to create our generic test tool kit, which could be used during the upgrade of projects. With help of this command, we could provide even better quality for our customers, as this will let us know of any not intended influence on the solution. While it is impossible to use this from the start of the project, it could help at the end of the project, as well as during the support period.
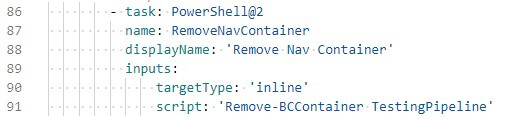
After all the tests are finished, we can remove the temporary container – this way we can save disk space.
You can use this as an example and transfer the PowerShell scripts you are using to the pipeline as well.
We hope you found this article on Azure DevOps Pipelines useful and it will help you to save you some time on preparing your work environment, and automatizing the processes. If you have any further questions regarding Azure Pipelines, please find detailed documentation attached here.