We all know what a difficult task can be Dynamics NAV report upgrade if you decide to change your reporting technology from Classic to RDLC. It requires quite a bit of knowledge and experience to make your reports look and work the same way as they did before. However, once you can identify all the tricky places that might cause problems and know what are the possible solutions for these problems, it is not really that painful. I hope this article will help you to make Dynamics NAV reports upgrade more joyful experience.
- For upgrading Dynamics NAV report you can use automated Dynamics NAV report converter tool, which converts AUTOMATICALLY Classic Dynamics NAV reports (supported up to Dynamics NAV 2009 R2) to newer RDLC NAV report format (Dynamics NAV 2013 R2 and above).
I will review 5 important topics related to Dynamics NAV report upgrade – starting with most common issues that cause problems in almost every report and finishing with a little more advanced features that you might not meet as often, but when you do, it might cause a lot of trouble.
1. Section visibilities
Let‘s start with simple stuff – section visibilities. In classic reports, you were able to write those straight into OnPreSection trigger of a section, using function SHOWOUTPUT. In RDLC reporting, it is a bit more complex than that: you can either
- move the code to OnAfterGetRecord trigger of related DataItem, assigning expression to a newly created boolean variable instead of SHOWOUTPUT function, and then use this variable for row visibility in layout;
- move expressions straight to row visibility in the layout.
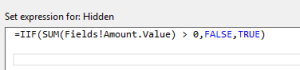
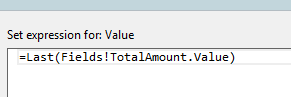
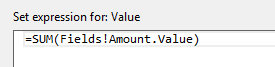
I believe this is nothing new for experienced NAV developers. However, the problem that is quite often left behind is footer section visibilities. If a footer section visibility is using any fields which are used in CREATETOTALS function in report‘s code, those fields are understood as totals. It means you also have to use a total value of a field in your visibility. So, when you meet visibility on footer section and this visibility is using some amounts, make sure to check if total amount is properly calculated in object’s code (in this case, use Last function in visibility in layout – see example 1.1) or total amount is calculated using CREATETOTALS function (in this case, use SUM function in visibility in layout – see example 1.2).
Example 1.1:
Total amount in calculated in code:

Function LAST is used in RDLC layout row visiblity:

Example 1.2:
Total amount is calculated using function CREATETOTALS:

Function SUM is used in RDLC layout row visibility:
2. Footer sections
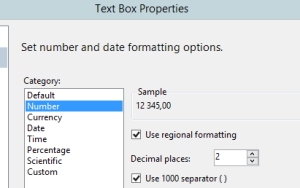
Talking about footer sections, there are usually a few things that you would like to check in RDLC if you want to make sure your totals calculation will work fine. First of all, the same as for footer visibility, always check if amount fields in the footer are properly totaled in object‘s code or CREATETOTALS function was used for total amount calculation. This way you will decide which function – LAST or SUM – you should use in report‘s layout (see examples 2.1 and 2.2). Secondly, if total amount was calculated by adding two or more fields together, I highly recommend to do this addition straight in layout instead of object‘s code or DataItem columns. This way the possibility of mistake will be reduced greatly (see example 2.3). Lastly, make sure that all of the textboxes which will contain amounts (decimal fields) have Format property defined in layout (see example 2.4). There is quite some option for various number formats in Visual Studio, you can check it out by right-clicking on Textbox and going to Properties -> Number. Actually, here you can find various formatting options for non-numeric fields too: date, time, currency and so on.
Example 2.1:
Total amount in calculated in code:

Function LAST is used in RDLC layout textbox expression:
Example 2.2:
The total amount is calculated using function CREATETOTALS:

Function SUM is used in RDLC layout textbox expression:
Example 2.3:
The expression made of two fields in footer section in classic report:

The same expression in RDLC layout:

Example 2.4:
Format property of a decimal field:

Various choices of formatting in TextBox Properties:
3. Moving sections to header and footer of the report
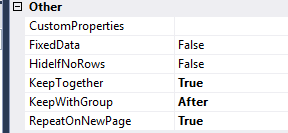
Another issue that requires some workarounds is moving sections to header and footer of the report. Be aware that header and footer of the report will reserve space in every page. Even if visibility is used on it and it is not visible on every page, there will remain blank space reserved for header/footer when you run your report. That means you should consider carefully which sections should be moved to header and footer of the report. It is best that only those sections which should actually be shown on every page are moved to header/footer. For other sections, try to leave them in body and use RepeatOnEveryPage property in. If this property is set to TRUE, it will show the row on every page, if it is set to FALSE, the row will be shown only on the first page (see example 3.1). This way you can control when your row is repeated, and a great thing is that if you are using visibility on your row in the body of the report if the row is not shown – blank space will not be reserved for it.
Example 3.1:
Go to Column Groups -> Advanced Mode. This way you will be able to see all of your report rows as statics in Row Groups:

Choose a header row that you want and choose desired properties in properties window:
4. GroupHeaders and GroupFooters
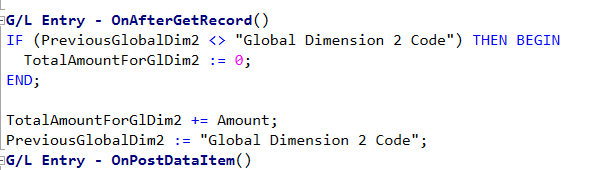
One more functionality that most probably will require refactoring is GroupHeaders and GroupFooters. In classic reports, you can fill in DataItem‘s property GroupTotalFields with desired fields and then use these fields for GroupHeader or GroupFooter sections. If there is more than one field defined in property than you can use TOTALSCAUSEDBY function in GroupHeader/GroupFooter OnPreSection trigger to define which field should cause appearance of the section. Alternative solution for RDLC report is to create new group on desired field from GroupTotalFields property and move the section to this group. The main issue is that sometimes there is code in OnPreSection/OnPostSection trigger of GroupHeader/GroupFooter. This code should only be executed when section is printed, which means only when the value of the field which causes GroupHeader/GroupFooter changes. In this case, what you have to do is move OnPreSection code to OnAfterGetRecord trigger of related DataItem and execute this code only if the value of the field causing groupheader/groupfooter changes. For this purpose, you can create new global variable (something like PreviousFieldValue) which you would compare to actual value of the field and see if the value has changed or not and if the code has to be executed or not (see example 4.1).
Example 4.1:
Calculation of Total Amount in GroupFooter section in Classic report:
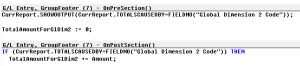
The code is only executed when “Global Dimension 2 Code“ changes and initiates the printing of GroupFooter section.
The exact situation has to be created in NAV 2017:
5. Percentage calculation in report
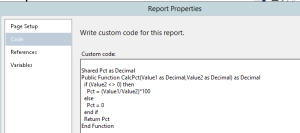
The last thing that I want to review is percentage calculation in the report. You might notice that if you are calculating some percentage values in your object’s code and then using those values in footer section – it does not work the same way as before. This is one of the cases where I would suggest using actual report‘s code in the layout. If you would go to Reports Properties -> Code, you will see quite some functions in there, which can be used anywhere in report‘s layout. So you can just add one more function there to calculate the percentage and then use this function by just calling it with needed parameters. It means that in footer section you can call this function and pass total amounts as parameters, and it will work just as in classic report (see example 5.1).
Example 5.1:
Percentage calculation function in report‘s code:
Function‘s execution in textbox expression:
