Guidelines for Partners
Introduction
Dynamics NAV to Dynamics 365 Business Central India localization data migration
Recently, I had the opportunity to do India localization data migration. I thought that India localization data migration processes would be the same as in other localizations, but I was wrong – it is more complex and time-consuming (even in Microsoft documentation, India localization is noted as an exception). In this article, I will describe data migration steps only required for India localization. I did The data migration from the Dynamics NAV 2016 version to the Dynamics 365 Business Central 2023 Release Wave 2 version so that this article will cover the steps for this particular data migration. But don’t be mistaken, even if this article describes this particular case, these data migration steps can be applied to other Dynamics NAV versions too.
Body
Data migration from an India version of Dynamics NAV 2016 to Business Central 2023 Release Wave 2 is a two-step process. Data of Dynamics NAV 2016 is migrated to Business Central Spring 2019 release, and then it is further migrated to Business Central 2023 Release Wave 2. Both intermediate and target Business Central versions must be of India localization.
These Dynamics NAV and Business Central versions were used in this data migration:
- Source – Dynamics NAV 2016 Cumulative Update 66 IN (NAV 900 CU66 IN)
- Intermediate – Business Central Spring 2019 Cumulative Update 52 IN (BC 1400 CU 52 IN)
- Target – Business Central 2023 Release Wave 2 Cumulative Update 4 IN (BC 2300 CU4 IN)
Conversion from Dynamics NAV 2016 to Business Central Spring 2019 does not require any special steps for India localization—the process is the same as for all other localizations. That is why the data migration steps required for India localization start after the database conversion to the Business Central Spring 2019 version.
Step 1 – Synchronize schema with validation option set to Later
After converting the Dynamics NAV 2016 database to the Business Central Spring 2019 version, connect the server instance to the database. Make sure the service user is assigned a db_owner role for the database.
Select all tables and compile them with the validation option set to Later. On the Tools menu, choose Compile (the shortcut key for compilation is F11). In the dialog box for selecting the schema synchronization, set the Synchronize Schema option to Later.
After compiling tables, build server application objects – on the Tools menu, choose Build Server Application Objects.
Step 2 – Run data upgrade
Open development environment as an administrator. On the Tools menu, choose Data Upgrade, choose Start, then select Serial Execution Mode and follow the instructions.
Once the data upgrade is completed, you can delete old unused tables if you haven’t done this before converting the database to the Business Central Spring 2019 version. Delete obsolete tables with Synchronize Schema – Force: 238|239|344|345|346|452|453|464|465|470|824..830|1303|1305|1510|5150|5181|5371|5372|8640
Step 3 – Publish System and Test applications
Open Windows PowerShell ISE as an administrator and import these modules:
Import-Module ‘C:\Program Files (x86)\Microsoft Dynamics NAV\140.CU52\Service\Microsoft.Dynamics.Nav.Management.dll’
Import-Module ‘C:\Program Files (x86)\Microsoft Dynamics NAV\140.CU52\Service\Microsoft.Dynamics.Nav.Apps.Management.dll’
After importing modules, publish System and Test applications using these commands:
Publish-NAVApp -ServerInstance <ServerInstanceName> -Path “C:\Data Migration\Applications\System.app” -PackageType SymbolsOnly -SkipVerification
Publish-NAVApp -ServerInstance <ServerInstanceName> -Path “C:\Data Migration\Applications\Test.app” -PackageType SymbolsOnly -SkipVerification
Note: System and Test applications can be found in the Business Central Spring 2019 DVD folder.
Step 4 – Generate symbol reference
Before generating a symbol reference, make sure that the “EnableSymbolLoadingAtServerStartup” property is set to true in the CustomSettings.config file.
Run these commands from a command prompt:
cd C:\Program Files (x86)\Microsoft Dynamics NAV\140.CU52\RoleTailored Client
finsql.exe Command=generatesymbolreference, ServerName=<ServerName>, Database=”<DatabaseName>”
We can check the progress of this process by opening Task Manager, selecting the Details tab, and finding process finsql.exe:
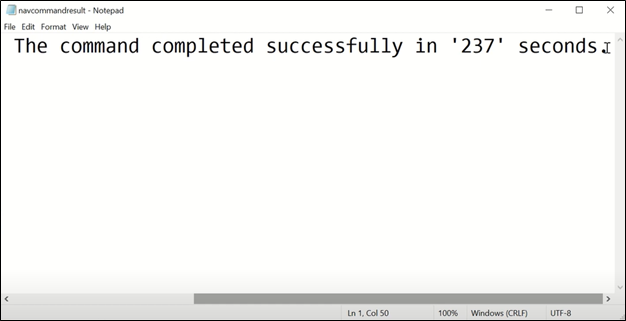
There will be two finsql.exe processes, but only one of their values will increase in the Memory column. The process will be finished after the one with the increasing value disappears. To check if the process was successful, you will need to go to the RoleTailored Client folder and find and open the newly generated file navcommandresult.txt. If the command was completed successfully, you should see this text:
Step 5 – Publish the “India Upgrade Tables” application
IndiaUpgradeTables.app file can be found in the Business Central Spring 2019 IN DVD folder (“<Path to DVD folder>\CU 52 Spring 19 Update IN\extensions”).
Publish and install the “India Upgrade Tables” application by using PowerShell commands:
Publish-NAVApp -ServerInstance <ServerInstanceName> -Path “C:\Data Migration\Applications\IndiaUpgradeTables.app” -SkipVerification
Sync-NAVApp -ServerInstance <ServerInstanceName> -Name “India Upgrade Tables”
Install-NAVApp -ServerInstance <ServerInstanceName> -Name “India Upgrade Tables”
Step 6 – Delete all objects except tables and system codeunits
Delete all objects except tables and system codeunits.
Delete India localization tables of range 13700..16599 with Synchronize Schema – Later.
Step 7 – Import BC 1400 CU52 IN objects
Until now, we had Dynamics NAV 900 CU66 IN objects converted to the BC 1400 CU52 version. In this step we will be actually importing BC 1400 CU52 IN version objects. BC 1400 CU52 IN objects FOB file can be found in the DVD folder, but if you had custom changes made in the NAV 900 CU66 IN version, you would need to merge those changes into demo BC 1400 CU52 IN database and export all objects as the FOB file.
In the development environment, import BC _1400CU52_IN_AllObjects.fob file.
When you import the FOB file, if you experience metadata conflicts, use the “Replace All” button in Import Worksheet to handle these conflicts.
Finally, on the dialog box, to select the schema synchronization, set the Synchronize Schema option to Later.
Step 8 – Import upgrade toolkit for BC 1400 CU 52 IN
The upgrade toolkit can be found in the Business Central Spring 2019 IN DVD folder (“<Path to DVD folder>\CU 52 Spring 19 Update IN\UpgradeToolKit\Local Objects”).
Import Upgrade90014x.IN.fob file.
When you import the FOB file, if you experience metadata conflicts, use the “Replace All” in the Import Worksheet to handle these conflicts.
Finally, on the dialog box, to select the schema synchronization, set the Synchronize Schema option to Later.
Recompile all tables by setting the Synchronize Schema option to Later. Make sure that all custom tables are compiled.
Step 9 – Run Schema Synchronization
Run the Sync. Schema For All Tables – With Validation option from the development environment.
Step 10 – Run data upgrade
On the Tools menu, choose Data Upgrade, choose Start, then select Serial Execution Mode and follow the instructions.
After running the data upgrade, generate symbol reference again:
finsql.exe Command=generatesymbolreference, ServerName=<ServerName>, Database=”<DatabaseName>”
Compile system tables by setting the Synchronize Schema option to Now – with validation.
Build server application objects again – choose Build Server Application Objects on the Tools menu.
Step 11 – Publish India localization extensions
India localization extensions application files can be found in the Business Central Spring 2019 IN DVD folder (“<Path to DVD folder>\CU 52 Spring 19 Update IN\extensions”).
Publish and install India localization extension applications by using PowerShell commands:
Publish-NAVApp -ServerInstance <ServerInstanceName> -Path “C:\Data Migration\Applications\IndiaTaxBase.app”
Sync-NAVApp -ServerInstance <ServerInstanceName> -Name “India Tax Base”
Install-NAVApp -ServerInstance <ServerInstanceName> -Name “India Tax Base”
Publish-NAVApp -ServerInstance <ServerInstanceName> -Path “C:\Data Migration\Applications\IndiaTaxEngine.app”
Sync-NAVApp -ServerInstance <ServerInstanceName> -Name “Tax Engine”
Install-NAVApp -ServerInstance <ServerInstanceName> -Name “Tax Engine”
Publish-NAVApp -ServerInstance <ServerInstanceName> -Path “C:\Data Migration\Applications\IndiaTaxGST.app”
Sync-NAVApp -ServerInstance <ServerInstanceName> -Name “India GST”
Install-NAVApp -ServerInstance <ServerInstanceName> -Name “India GST”
Publish-NAVApp -ServerInstance <ServerInstanceName> -Path “C:\Data Migration\Applications\IndiaUPGTCS.app”
Sync-NAVApp -ServerInstance <ServerInstanceName> -Name “India TCS”
Install-NAVApp -ServerInstance <ServerInstanceName> -Name “India TCS”
Publish-NAVApp -ServerInstance <ServerInstanceName> -Path “C:\Data Migration\Applications\IndiaUPGTDS.app”
Sync-NAVApp -ServerInstance <ServerInstanceName> -Name “India TDS”
Install-NAVApp -ServerInstance <ServerInstanceName> -Name “India TDS”
Publish-NAVApp -ServerInstance <ServerInstanceName> -Path “C:\Data Migration\Applications\INFADepreciation.app”
Sync-NAVApp -ServerInstance <ServerInstanceName> -Name “Fixed Asset Depreciation for India”
Install-NAVApp -ServerInstance <ServerInstanceName> -Name “Fixed Asset Depreciation for India”
Publish-NAVApp -ServerInstance <ServerInstanceName> -Path “C:\Data Migration\Applications\INGateEntry.app”
Sync-NAVApp -ServerInstance <ServerInstanceName> -Name “India Gate Entry”
Install-NAVApp -ServerInstance <ServerInstanceName> -Name “India Gate Entry”
Publish-NAVApp -ServerInstance <ServerInstanceName> -Path “C:\Data Migration\Applications\INVoucherInterface.app”
Sync-NAVApp -ServerInstance <ServerInstanceName> -Name “India Voucher Interface”
Install-NAVApp -ServerInstance <ServerInstanceName> -Name “India Voucher Interface”
Publish-NAVApp -ServerInstance <ServerInstanceName> -Path “C:\Data Migration\Applications\UPGIndia.app”
Sync-NAVApp -ServerInstance <ServerInstanceName> -Name “India Data Migration”
Install-NAVApp -ServerInstance <ServerInstanceName> -Name “India Data Migration”
Step 12 – Run India localization data migration
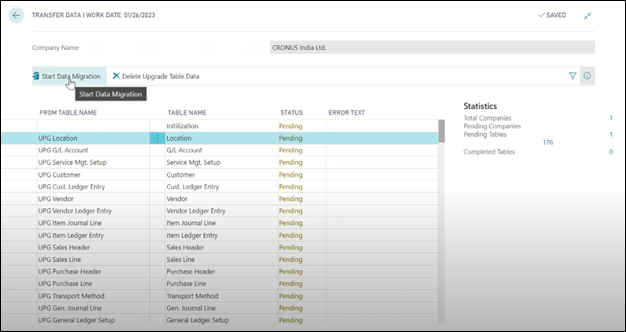
From RoleTailored Client or Web Client, open page “Transfer Data” and click on action “StartData Migration”:
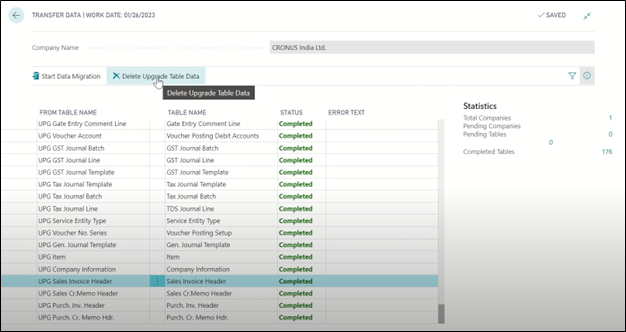
The status column value should change from Pending to Completed for all tables. Repeat the same process with all companies. After data migration is completed, click on the action “Delete Upgrade Table Data” to delete data from upgrade tables:
Step 13 – Finalize data migration to BC 1400 CU 52 IN
Delete objects that now have Version List *UPG*. When deleting, use Synchronize Schema – Force.
After deleting upgrade objects, run Sync. Schema For All Tables, and then choose Force.
Step 14 – Unpublish and uninstall all extensions
During this step we need to unpublish and uninstall all extensions, India localization extensions included. Run page 2500 “Extension Management”, choose all installed extensions and uninstall them by pressing action buttons “Uninstall” and “Unpublish”. Write down all of the extensions because they will have to be re-installed later.
If the “Uninstall” action is missing, use PowerShell commands to get a list of all installed extensions and uninstall them:
Get-NAVAppInfo -ServerInstance <ServerInstanceName>
Get-NAVAppInfo -ServerInstance <ServerInstanceName> -SymbolsOnly
Uninstall-NAVApp -ServerInstance <ServerInstanceName> -Name “India Data Migration”
Unpublish-NAVApp -ServerInstance <ServerInstanceName> -Name “India Data Migration”
Uninstall-NAVApp -ServerInstance <ServerInstanceName> -Name “India Voucher Interface”
Unpublish-NAVApp -ServerInstance <ServerInstanceName> -Name “India Voucher Interface”
Uninstall-NAVApp -ServerInstance <ServerInstanceName> -Name “India Gate Entry”
Unpublish-NAVApp -ServerInstance <ServerInstanceName> -Name “India Gate Entry”
Uninstall-NAVApp -ServerInstance <ServerInstanceName> -Name “Fixed Asset Depreciation for India”
Unpublish-NAVApp -ServerInstance <ServerInstanceName> -Name “Fixed Asset Depreciation for India”
Uninstall-NAVApp -ServerInstance <ServerInstanceName> -Name “India TDS”
Unpublish-NAVApp -ServerInstance <ServerInstanceName> -Name “India TDS”
Uninstall-NAVApp -ServerInstance <ServerInstanceName> -Name “India TCS”
Unpublish-NAVApp -ServerInstance <ServerInstanceName> -Name “India TCS”
Uninstall-NAVApp -ServerInstance <ServerInstanceName> -Name “India GST”
Unpublish-NAVApp -ServerInstance <ServerInstanceName> -Name “India GST”
Uninstall-NAVApp -ServerInstance <ServerInstanceName> -Name “Tax Engine”
Unpublish-NAVApp -ServerInstance <ServerInstanceName> -Name “Tax Engine”
Uninstall-NAVApp -ServerInstance <ServerInstanceName> -Name “India Tax Base”
Unpublish-NAVApp -ServerInstance <ServerInstanceName> -Name “India Tax Base”
Uninstall-NAVApp -ServerInstance <ServerInstanceName> -Name “India Upgrade Tables”
Unpublish-NAVApp -ServerInstance <ServerInstanceName> -Name “India Upgrade Tables”
After this step, complete all standard steps required to upgrade from BC 1400 CU52 IN to BC 2300 CU4 IN:
Clean solution – Replace all standard modified tables with the new unchanged ones from Demo database.
Delete objects – Delete all objects, except tables and system codeunits.
Convert database – Convert database from BC 1400 to BC 2300 version.
Publish System and Base applications for BC 2300 CU4 IN version.
Run Schema Synchronization – Synchronize the tenant, system and base applications.
Run data upgrade – Start data upgrade for the System and Base applications.
Step 15 – Publish India localization extensions for BC 2300 CU4 IN
This step comes after completing the data upgrade to BC 2300 CU4 IN. Before publishing India localization extensions, ensure that the Microsoft_Application.app is published and installed. Publish and install India localization extension applications by using PowerShell commands:
Publish-NAVApp -ServerInstance <ServerInstanceName> -Path “C:\Data Migration\Applications\Microsoft_Tax Engine.app” -SkipVerification
Sync-NAVApp -ServerInstance <ServerInstanceName> -Name “Tax Engine”
Start-NAVAppDataUpgrade -ServerInstance <ServerInstanceName> -Name “Tax Engine” -Tenant default
Publish-NAVApp -ServerInstance <ServerInstanceName> -Path “C:\Data Migration\Applications\Microsoft_India Tax Base.app” -SkipVerification
Sync-NAVApp -ServerInstance <ServerInstanceName> -Name “India Tax Base”
Start-NAVAppDataUpgrade -ServerInstance <ServerInstanceName> -Name “India Tax Base” -Tenant default
Publish-NAVApp -ServerInstance <ServerInstanceName> -Path “C:\Data Migration\Applications\Microsoft_QR Generator.app” -SkipVerification
Sync-NAVApp -ServerInstance <ServerInstanceName> -Name “QR Generator”
Install-NAVApp -ServerInstance <ServerInstanceName> -Name “QR Generator”
Publish-NAVApp -ServerInstance <ServerInstanceName> -Path “C:\Data Migration\Applications\Microsoft_India GST.app” -SkipVerification
Sync-NAVApp -ServerInstance <ServerInstanceName> -Name “India GST”
Start-NAVAppDataUpgrade -ServerInstance <ServerInstanceName> -Name “India GST” -Tenant default
Publish-NAVApp -ServerInstance <ServerInstanceName> -Path “C:\Data Migration\Applications\Microsoft_India Gate Entry.app” -SkipVerification
Sync-NAVApp -ServerInstance <ServerInstanceName> -Name “India Gate Entry”
Start-NAVAppDataUpgrade -ServerInstance <ServerInstanceName> -Name “India Gate Entry” -Tenant default
Publish-NAVApp -ServerInstance <ServerInstanceName> -Path “C:\Data Migration\Applications\Microsoft_India TCS.app” -SkipVerification
Sync-NAVApp -ServerInstance <ServerInstanceName> -Name “India TCS”
Start-NAVAppDataUpgrade -ServerInstance <ServerInstanceName> -Name “India TCS” -Tenant default
Publish-NAVApp -ServerInstance <ServerInstanceName> -Path “C:\Data Migration\Applications\Microsoft_India TDS.app” -SkipVerification
Sync-NAVApp -ServerInstance <ServerInstanceName> -Name “India TDS”
Start-NAVAppDataUpgrade -ServerInstance <ServerInstanceName> -Name “India TDS” -Tenant default
Publish-NAVApp -ServerInstance <ServerInstanceName> -Path “C:\Data Migration\Applications\Microsoft_India Voucher Interface.app” -SkipVerification
Sync-NAVApp -ServerInstance <ServerInstanceName> -Name “India Voucher Interface”
Start-NAVAppDataUpgrade -ServerInstance <ServerInstanceName> -Name “India Voucher Interface” -Tenant default
Publish-NAVApp -ServerInstance <ServerInstanceName> -Path “C:\Data Migration\Applications\Microsoft_Fixed Asset Depreciation for India.app” -SkipVerification
Sync-NAVApp -ServerInstance <ServerInstanceName> -Name “Fixed Asset Depreciation for India”
Start-NAVAppDataUpgrade -ServerInstance <ServerInstanceName> -Name “Fixed Asset Depreciation for India” -Tenant default
Publish-NAVApp -ServerInstance <ServerInstanceName> -Path “C:\Data Migration\Applications\Microsoft_India Reports.app” -SkipVerification
Sync-NAVApp -ServerInstance <ServerInstanceName> -Name “India Reports”
Install-NAVApp -ServerInstance <ServerInstanceName> -Name “India Reports”
Publish-NAVApp -ServerInstance <ServerInstanceName> -Path “C:\Data Migration\Applications\Microsoft_India Data Migration.app” -SkipVerification
Sync-NAVApp -ServerInstance <ServerInstanceName> -Name “India Data Migration”
Start-NAVAppDataUpgrade -ServerInstance <ServerInstanceName> -Name “India Data Migration” -Tenant default
Conclusion
Dynamics NAV to Dynamics 365 Business Central India localization data migration
In summary, India localization data migration requires additional steps, since starting from the latest BC 1400 IN cumulative updates, standard India localization table fields and standard India localization objects are removed from the base application and put in different applications. This guide has described the steps required to complete India localization data migration, covering migration from intermediate to target version.