But first…
Why Tenant Extensions?
If you are in an On-Prem world, you have 3 options on how to customize Business Central:
- Good old C/AL customization (will be depreciated in 6 – 18 months)
- VSCode AL Extension
- AppSource Apps via .app file (from Business Central CU2)
If you are in the Cloud world, you have only 2 options for the same:
- VSCode AL Extension
- AppSource Apps (Embedded)

Despite the fact that AppSource Apps are built also in VSCode with the power of AL language, there are different definitions. Apps, built in 70M range are called AppSource Apps, and Apps built-in 50K range are called Per-Tenant Extensions (or Per-Tenant Customizations, or Tenant Customizations, or Tenant Extensions… somebody stop me please :)
When you register new Online Business Central for a new/existing customer (or yourself), it creates new Business Central Tenant. So, each customer has each Tenant. Good. And each customer is unique, with his own “I want”. Right?
That’s why we need to have the ability to “customize” (or frankly speaking – extend) each tenant individually. That’s why extensions, built for specific online BC customer are called Per-Tenant Extensions, and that’s why we need to have them.
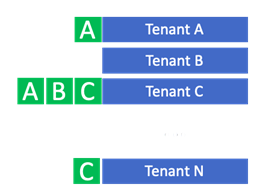
That’s how it can look like (green boxes – are tenant extensions).
Good, and what?
Well, here I will not repeat my own webinar about Tenant-Extensions (but you are welcomed to watch it). Here I will provide you with some summary and lessons I learned during last weeks.
In-Client Designer
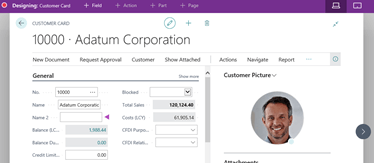
If you will click on “Design” mode in the UI of your Business Central Sandbox (Cloud or Prem), you will start … Design mode

What you can do here? Well, all this.
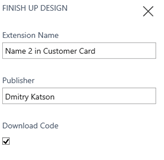
Assume I’ve added “Name 2” to the Customer Card and saved that as my new extension.
Then clicked on “Design” mode and removed this field… and saved that also as a new extension.
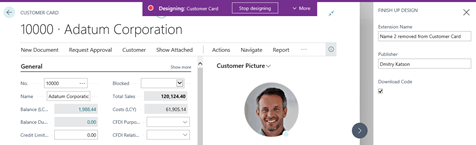
You see where I’m going. The result is the same as before the first run of Design mode (you don’t have “Name 2” field). But … now you have two per-tenant extensions.
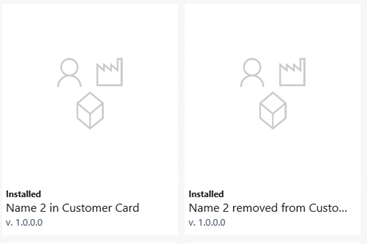
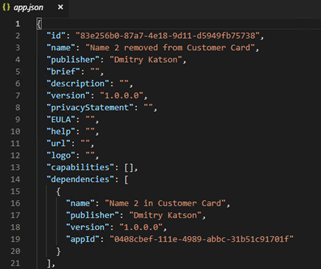
and the second one is dependent on the first one
Now, if you will try to upgrade your first extension (let’s say you’ve decided to make “Name 2” not so important, and you increased version) you will get into dependency trouble.
To proceed upgrade you will need to:
- Uninstall v 1.0 of the first extension (this will trigger uninstall of the second extension)
- Upload v 2.0 of the first extension
- Install the second extension once again, manually
You see, that with “Design” Per-Tenant Extensions process becomes too complicated, and what’s more important – unmanageable.
Tip #1 Don’t use “Design” mode.
Tip #2 If you want to use “Design” feature, use F6 (Publish & open in Designer) from VSCode, connected to your online BC tenant. This will not create a separate extension for each “Design”.
Tip #3 Create only one Extension per Tenant for such “Design” things.
Tip #4 Exclude all dependencies. If after “Design” you got Extension, that is dependent on other extension (s) – uninstall, unpublish it immediately and use Tip #2.
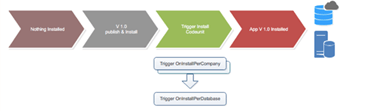
The first version of Per-Tenant Extension
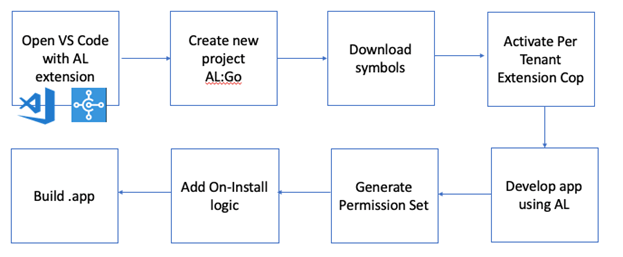
Let’s say you decided to create Per-Tenant Extension from VSCode. Good, you are in the right direction.
Just save this picture and follow these steps:
Tip #5 Check that you have the latest version of AL. If not – update it.
Last week I’ve got into trouble when I built my Per-Tenant Customization (PTC) and my AL extension was not updated. It compiled perfectly, .app file was created.
But when I tried to upload it to the Online Business Central Tenant, I’ve got an error “Object reference not set to an instance of an object”
It took me about 2 hours to figure out where was the problem. Don’t repeat my mistakes.
Trick Turn on auto-update of VSCode Extensions.
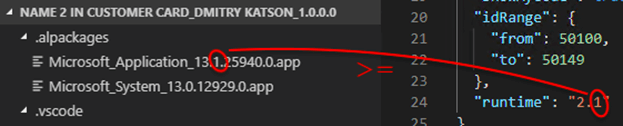
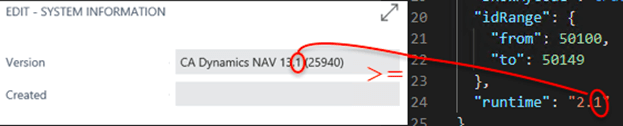
Tip #6 Check that runtime version option in the .app file is lower than the version of YOUR BC Tenant.
Next trouble where I’ve got resulted in the next error, during upload extension process: “The runtime version of the extension package is currently set to ‘2.2’. The runtime version must be set to ‘2.1’ or earlier in the app.json file in order to install the extension package on this server.”
After some investigation, I found that my Online BC Tenant was not upgraded to CU2 (still was on CU1). But my latest docker sandbox was already on CU2.
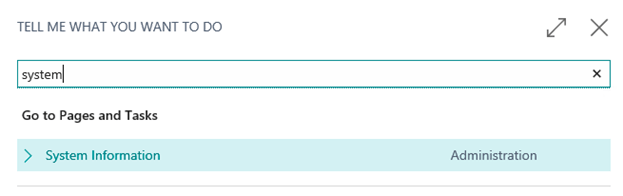
Trick Connect to your Online BC Tenant and Download Symbols once again. Check that your platform symbols .app file name version is greater or equal to runtime version
Trick Connect to your Online BC Tenant web client and search for System Information. Check that your platform version is greater or equal to runtime version
Tip #7 Activate PerTenantExtensionCop to remind you to add Permission Set
Usual thing, when you upload Extension to BC Tenant will be an error “Table _ is missing a matching permission set.”. To avoid that you should create PermissionSet.xml file describing permissions to your new objects. By activating TenantExtensionCop you will never forget about that.

![]()
Trick Use Ctrl:Shift+P AL: Generate permission set containing current extension objects to create/update your PermissionSet.xml file

Tip #8 Add On-Install Logic. This is optional, but anyway – if you have some configuration or demo data to be published, during first-install process add On-Install logic.
Note, here I mentioned first-install, not every-time-install. The difference is huge.
I think you know, that when you install an app for the first time OnInstall trigger runs.
But, when you Uninstall and Install App once again – OnInstall trigger also runs.
Some months ago, I’ve got into trouble. I added some default configuration data to the Install logic, then my customer installed app and everything worked fine. Then customer uninstalled and installed my app once again, and all default configuration data was populated once again. That wouldn’t be a problem if a customer didn’t change them in the middle. So, when he installed my app for the second time, his configuration was deleted, and default was populated once again.
Trick To avoid this scenario use this Install logic
codeunit 50000 “AIR My App Install”
{
Subtype = Install;
trigger OnInstallAppPerCompany()
begin
HandleFreshInstall();
HandleReinstall();
end;
local procedure HandleFreshInstall();
begin
if Not CheckIfThisIsFirstInstallOfApp() then
exit;
PopulateAppWithDefaultData();
end;
local procedure HandleReInstall();
begin
if CheckIfThisIsFirstInstallOfApp() then
exit;
end;
local procedure CheckIfThisIsFirstInstallOfApp(): Boolean
var
AppInfo: ModuleInfo;
begin
NavApp.GetCurrentModuleInfo(AppInfo);
exit(AppInfo.DataVersion() = Version.Create(0, 0, 0, 0));
end;
local procedure PopulateAppWithDefaultData()
begin
// Do something here
end;
}
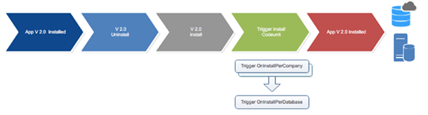
Next version of Per-Tenant Extension
This is a typical process of upgrading your app
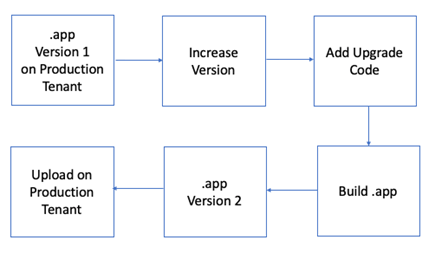
Tip #9 Always increase your app version before uploading it to the online BC tenant. Otherwise you will get an error “An extension with same App ID and version has already been uploaded. Resolve and deploy again.”
Tip #10 Don’t upload the same Per-Tenant Extension to different online BC Tenants. You will get the same error as in the Tip #9.
I think you have something like … “what a sh**t?” in mind. My extension is called Per-Tenant which means the same extension should work for each tenant independently. However, reality is a bit different.
Truth is – the same Extension can be uploaded to different BC tenants only if
- Regions differ. Each regional service is isolated, so you will be able to upload the same PTC to different regional services without any errors.
- Package ID is the same. Package ID is a unique id for every compilation of the extension. If you will package your app once and will upload this .app file to different tenants (inside onereginalservice) you will not get any errors. That’s a bit “hack” but it works.
- App ID or Version are different. You can upload the same app (with the same App ID) to another tenant in the same regional service by increasing Version No. Or you can leave the version as is, but change the App ID. In bothcasesapp will be uploaded without any errors.
- Name, Publisher and Version are different. You can leave App ID as is, but change Name, Publisher and Version. In thatcaseyour app will be uploaded to another tenant in the same regional service without any errors.
For me, personally, none of these points is a solution. I want to be able to upload the same PTE to different tenants in the same regional services, without any exceptions. I’ve added an idea here so you can vote for it.
Trick Well, not much a trick, just steps how I check that everything works locally, before uploading to the cloud tenant.
#Step 1. Check Tips#1 – Tip#9 (including latest AL version and ExtensionCodCop is activated)
#Step 2. Build .app file with AL: Package command
#Step 3. Create new docker sandbox with exact same version of BC as my online BC is.
#Step 4. Install in this local docker sandbox previous version of my app (if I have that).
#Step 5. Run script to publish my app
Publish-NavContainerApp -containerName $ContainerName `
-appFile $FullPathToMyAppFile `
-install `
-sync `
-skipVerification `
-packageType Extension `
-scope Tenant
Here you will see all possible errors (except Tip#10), and you will be able to solve them before going to the cloud.
Hope this was valuable, happy codding!