Guidelines for Partners
Ever since the release of Business Central 21, the system application has been supplied with a variety of modules that offer BC developers various tools to help them achieve the result they need. However, when migrating to the cloud, developers often have issues refactoring various file system usage cases, specifically – the file management codeunit. The purpose of this guideline is to provide an introduction to the system application’s Sharepoint connector module, which can aid the developer by providing an alternative to file management.
Setting up the Azure App
Many third-party Sharepoint connectors are built upon OAuth2.0 and Graph API usage, and this connector is also based on similar principles. Like other connectors, the Azure application will act as a gateway to the Sharepoint site. Therefore we need to set up an Azure app so that we may retrieve the information required for the Sharepoint module to establish and initialize a connection to the site we wish to use.
The following information is needed for the module to connect to a site:
- Client ID
- Client secret
- Site URL
Let’s begin by opening up our Azure portal.
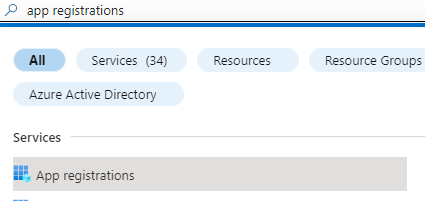
Once logged in, the app can be registered through the “App registrations” menu, which can be found on the home page or through the search bar.
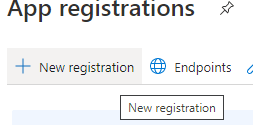
In the app registration menu, an app can be created with the “New registration” action.
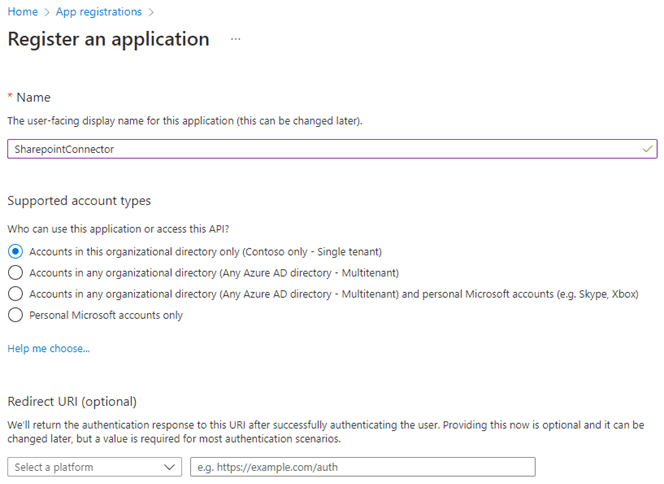
The registration requires only the application’s name; the redirect URI for this connector is optional and can be skipped.
Once the app has been registered, only a few additional steps are required to finish the setup. Finally, the Client ID can be copied onto the clipboard within the overview page since it will be used later for authorization.
The next step is now to set up the Client’s secret, which can be done so through the “Certificates & Secrets” menu, and create a new mystery:
Once the secret has been created, the Value of the secret must be copied and saved somewhere since it will be hidden soon after for security purposes, thus requiring the user to create a new secret.
Lastly, the app will need to have additional permissions set up:
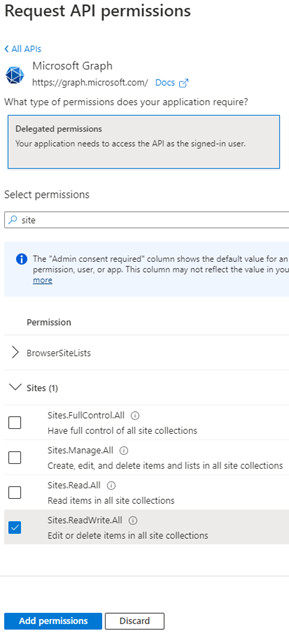
This can be done by accessing the “API Permissions” menu and selecting the “Add Permission” action.
The only permissions required for the connector to work are only delegated Sites.ReadWrite.All.
Once the permissions have been delegated, the setup is complete, and the Sharepoint Authorization module can now connect to a site.
Connecting to a Sharepoint Site
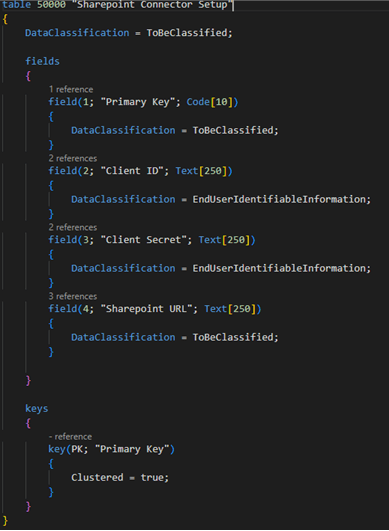
The information collected from the Azure application setup will be used later to authorize and connect to a site. This is why the first step towards utilizing the connector is creating a setup table to store the data.
The setup table may only contain the necessary information but can be extended to suit various other requirements:
- Client ID
- Client Secret
- Sharepoint URL
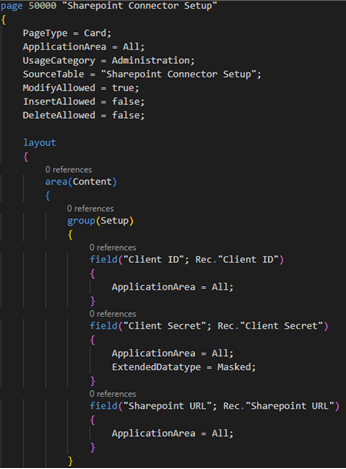
The same fields should also be displayed on an appropriate page, in which the user can save the copied values from the Azure application.
Once the setup table and page have been created, we can create various connection-related functions for our Sharepoint site. The best practice for creating sharepoint related functions is to have a dedicated codeunit for those functions and a global variable to store the connection status.
Sharepoint connector Initialization
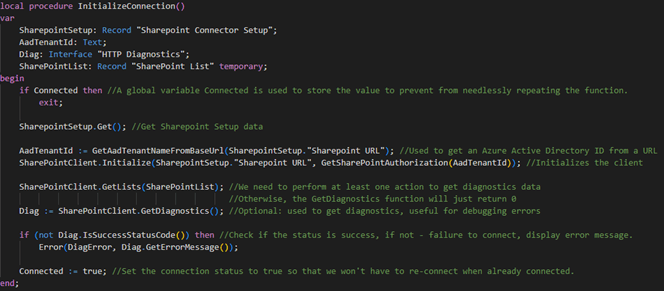
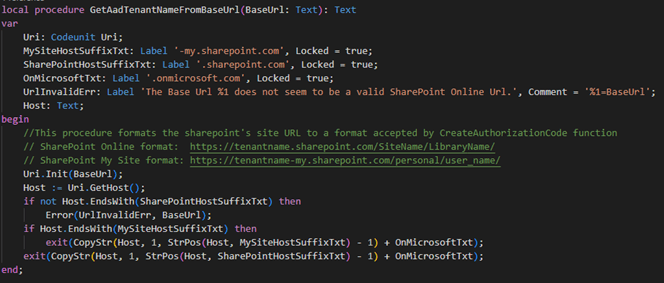
First and foremost, the Sharepoint connector instance needs to be initialized whenever any interaction needs to be performed. Therefore, the connector codeunit will have to store a local initialization procedure along with a few others:
The GetAadTenantNameFromBaseUrl format is the copied Sharepoint site URL to an accepted format by the CreateAuthorizationCode function. The GetSharePointAuthorization additionally adds a default scope as a parameter.
The function then calls CreateAuthorizationCode from the Sharepoint Auth. Codeunit, which returns an interface containing the authorization code. If the authorization is successful, the connection should be fully established to the site, and the Connected variable can be set to true.
Saving a File with the Sharepoint connector module
The most basic action that can now be performed with the Sharepoint module is to save a file from a stream into a site. Saving a file requires a file name, an InStream, and a server-relative URL (Directory), which can be expressed similarly to a regular Windows directory “/sites/SPLN2/Shared Documents/etc.”.
Downloading a File with the Sharepoint connector module
Before attempting to perform any actions with a specific file within a sharepoint site, a list of files within a specific directory must be retrieved. The Sharepoint module contains two specific records that help temporarily store and use file and folder data:
- Table 9106 “SharePoint Folder”
- Table 9100 “SharePoint File”
Often, the Sharepoint Module will use these tables for storing retrieved data. The module’s Sharepoint Client codeunit contains 2 useful functions which can be used to retrieve a list of folders or files within a directory:
- GetSubFoldersByServerRelativeUrl
- GetFolderFilesByServerRelativeUrl
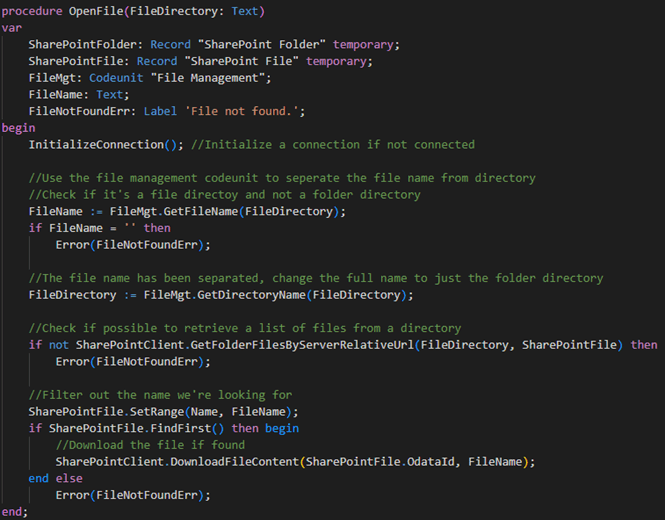
Both functions only require a relative path as a parameter and a temporary record to store that retrieved data. With the help of the file management codeunit, a function to download a file within a drive can be created, which only requires a directory as a parameter.
The only issue regarding downloading a file is that the DownloadFileContent function only prompts the user to download the file to their system instead of allowing the code to save the file to a stream. At the moment, the sharepoint module cannot return a stream with the file contents, but anyone within the Business Central community can resolve this in the future.
Retrieving lists with the Sharepoint connector module
Another major feature of the Sharepoint module would be its capability to retrieve lists of items from a site. This may allow the user to create their own navigation page to replicate file saving or opening dialogs.
The following functions have been created:
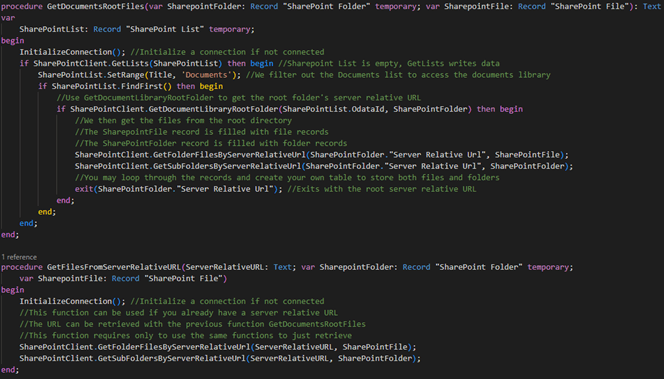
GetDocumentsRootFiles: This procedure is created to retrieve the root folder URL for later use. The procedure uses GetLists to retrieve all the lists available within the sharepoint site, but it filters out the “Documents” list specifically to access the stored files. The function later uses the previously mentioned functions to retrieve folder and file data.
GetFilesFromServerRelativeURL: The function uses the same 2 functions to retrieve a list of files and folders once the system knows the root folder URL or the server relative URL of any other folder within the Sharepoint site.
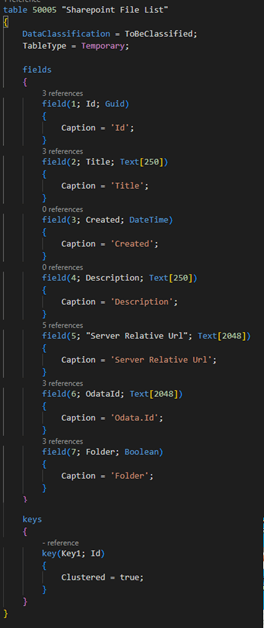
The procedures we have created can now be utilized for various purposes. In this example, a temporary table with a list page has been created to store file data and display them in a list to allow the user to navigate through the site’s files.
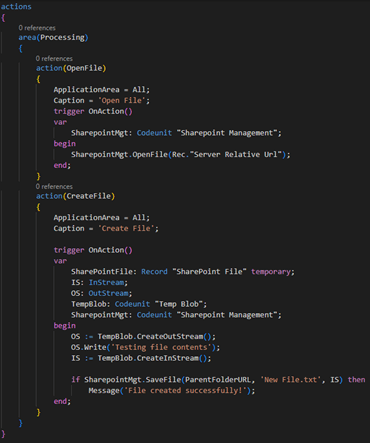
The appropriate list page has been created and supplied with the features created for the Sharepoint Management codeunit.
Summary
The Sharepoint module is a step forward for BC developers to have an easier alternative to create file managing capabilities for their application and participate in the extension and development of this and various other system application modules. Currently, the Sharepoint module still lacks several features to allow the user to replicate various file management scenarios in their cloud solution fully. Still, this can be remedied in a given time through community-made pull requests within Mirosoft’s GitHub.
The code presented in this guideline is available for download on GitHub.
