Guidelines for Partners
Interfaces in AL (in Microsoft Dynamics 365 Business Central) allow developers to create flexible, extensible solutions. They make it possible for different extensions or apps to “plug in” their own logic without modifying the original code. This is especially useful when building AppSource apps that other developers may want to extend.
1. What Is an Interfaces in AL?
An interface in AL is essentially a contract. It specifies which functions must exist, but not how they should work. Think of it as a blueprint that guarantees structure while leaving the implementation details open.
Defines required functions: The interface lists the procedures that any implementing object must provide.
No implementation: It contains only signatures—no code, no logic.
No state: Interfaces don’t store data. They define behavior, not values.
Polymorphism: Different implementations can provide different behavior for the same function call.
2. Important Facts About Interfaces in AL
- Interfaces are a relatively new feature
They were first introduced in Business Central 2020 release wave 1, and since then Microsoft has continued improving them. - You can quickly find all implementations
Starting from Business Central 2023 release wave 1, Visual Studio Code lets you see every codeunit or enum that implements an interface. You can do this by right‑clicking the interface and choosing Go to Implementations, or by pressing Ctrl + F12. This makes it very easy to explore how the interface is used in your project. - Interfaces can be extended
AL now allows you to extend an existing interface by adding new procedures without changing the original design. This gives you a safe way to improve functionality over time while keeping the interface clean. - Interfaces do not have IDs
Unlike tables, pages, and codeunits, an interface is the only AL object type that does not require an object ID. You simply define it by name. - Interfaces can be marked as obsolete
Just like other AL objects, you can mark an interface as obsolete using: ObsoleteState, ObsoleteReason, ObsoleteTag. This helps manage changes safely and keeps your code upgrade friendly. - There is a quick shortcut for creating interfaces
When using the AL extension in Visual Studio Code, typing tinterface automatically inserts the basic template for a new interface. This saves time and keeps your code consistent.
3. How to Create Interfaces in AL
3.1. Define the Interface
The first step is to define the contract that all payment providers must follow.
In our example, we create an interface called IPaymentService with a single method:

This means:
- Any codeunit that implements IPaymentService must include a Pay() method.
- The interface itself contains no logic — it only describes what must exist.
3.2. Creating Codeunits That Implement the Interface
Next, we create individual codeunits representing different payment providers.
Each provider implements the same interface but behaves differently.
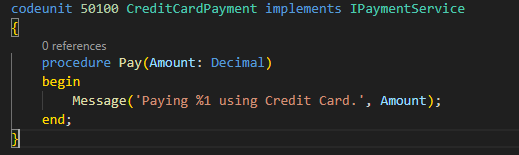
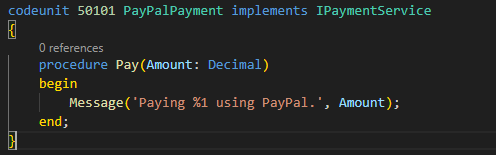
Here you can see the key benefits of interfaces:
- Both providers have the same “shape”, but each performs its own logic.
3.3. Connecting the Implementations via an Enum
To make these implementations usable in Business Central, we bind them to an enum.
Each enum value corresponds to a concrete payment service.
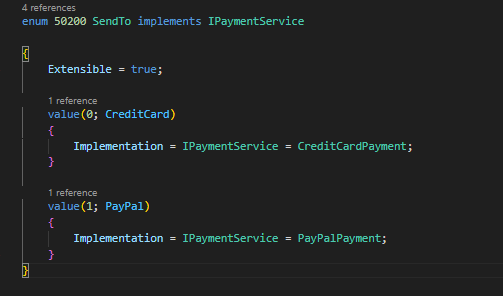
This tells Business Central:
- If the enum value is CreditCard, use CreditCardPayment
- If the enum value is PayPal, use PayPalPayment
This pattern is widely used in the Base App (for example: price calculation, VAT registration, posting routines, and so on).
3.4. Using the Interface in a Page
Finally, we call the interface from a Page Extension.
Because the enum is linked to implementations, assigning the enum value picks the provider automatically:
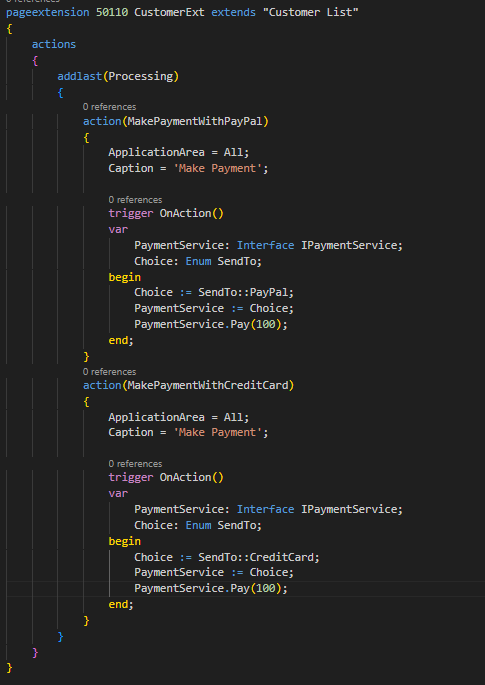
3.5. What’s happening here?
- The user clicks a button → “Pay with PayPal” or “Pay with Credit Card”.
- We assign the appropriate enum value (SendTo::PayPal or SendTo::CreditCard).
- The enum determines which implementation to use.
- The call PaymentService.Pay(100) runs the correct codeunit.
All without IF, without CASE, and without hard‑coding codeunit IDs.
4. Using Interfaces in AL from the Base App
4.1. Open the Interface
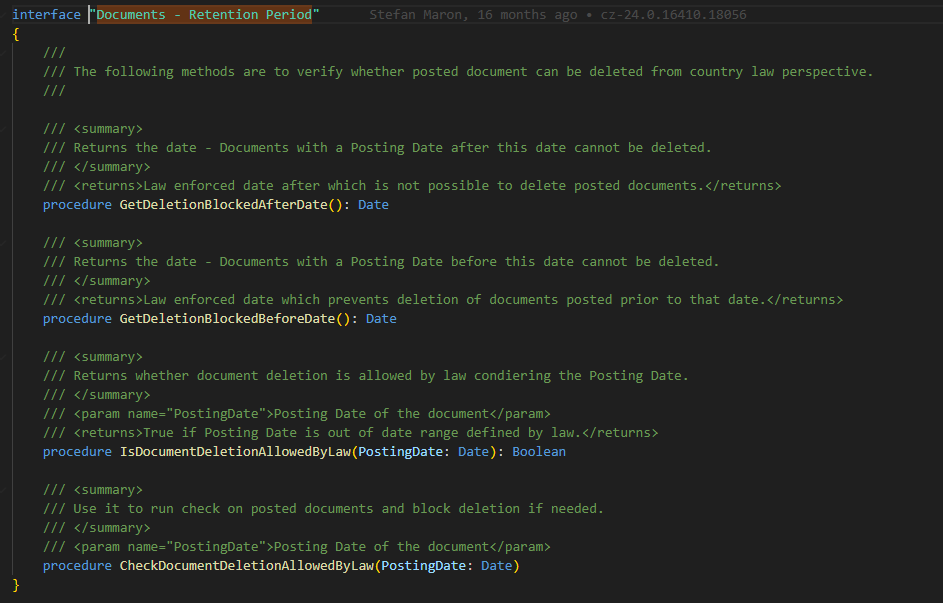
When you open the “Documents – Retention Period” interface, you can clearly see the list of methods that every implementation must provide. These required members form the core contract of the interface and include the following procedures:
- GetDeletionBlockedAfterDate()
- GetDeletionBlockedBeforeDate()
- IsDocumentDeletionAllowedByLaw()
- CheckDocumentDeletionAllowedByLaw()
Each of these methods defines a specific part of the retention‑period logic, ensuring that any provider implementing this interface follows the same structure while still allowing for different business rules or behaviors.
4.2. Creating the Codeunit That Implements the Interface
Once we have identified the “Documents – Retention Period” interface, the next step is to create a new codeunit that implements it.
This codeunit becomes our custom provider, supplying the logic that Business Central will use when handling retention period rules.
In our example, we created Codeunit 50200, which implements the interface and provides the required procedures.
Because an interface only defines what must exist, we are responsible for adding the how within our implementation.
Below is the created codeunit:

This implementation is very simple, but it clearly demonstrates the concept:
- GetDeletionBlockedAfterDate() and GetDeletionBlockedBeforeDate() return the dates used to determine whether deletion is allowed.
- IsDocumentDeletionAllowedByLaw() returns a Boolean that represents whether a document can legally be removed.
- CheckDocumentDeletionAllowedByLaw() shows how custom validation or messaging can be inserted.
At this point, we have a fully functioning retention‑period provider.
4.3. Linking the Provider Using an Enum Extension
After creating the codeunit, the next step is to register it in Business Central using an enum extension.
Why? Because many interfaces in the Base App—including this one—are activated through an enum.
Each enum value represents a different implementation of the interface.
By extending the relevant enum, we allow Business Central to recognize and use our custom provider.
Here is the enum extension we added:
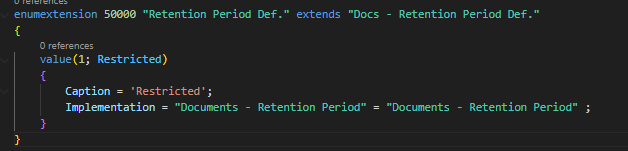
“When the user selects the option Restricted, use our codeunit implementation of the Documents – Retention Period interface.”
This connects the enum value → to the interface → to your codeunit.
5. Conclusion: Why We Use Interfaces in AL
Interfaces make Business Central easier to build, customize, and maintain. They start by giving you a clear contract: if you want to plug into a feature, you must create the procedures listed in the interface. This removes confusion and makes sure everyone follows the same rules.
Interfaces also let you swap logic without touching the original code. That means you can change how something works depending on the customer, country, business process, or another extension — all without rewriting existing functionality.
For AppSource solutions, interfaces are especially helpful because they make your app stable, safe, and upgrade friendly. You can expose extension points without breaking anything in the future.
While events allow you to add extra logic, interfaces allow you to replace logic in a clean and controlled way.
Finally, interfaces help keep your solution tidy. They make your code easier to understand, easier to test, and less dependent on other parts of the system.
In short: interfaces keep your Business Central apps flexible, clean, and ready for the future.